Queen versus Three 3 Connected Pawns

Most of you know how to win a Queen versus a single pawn in the endgame. Some of you may also know how to do the same if your opponent has, not one, but two pawns in the endgame.


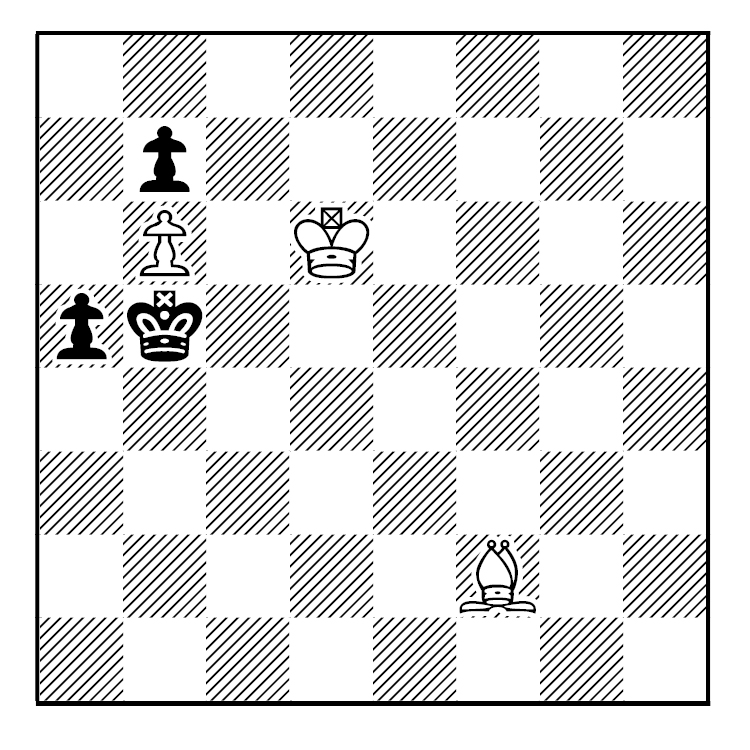
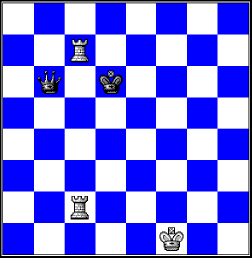
White to Play and Win
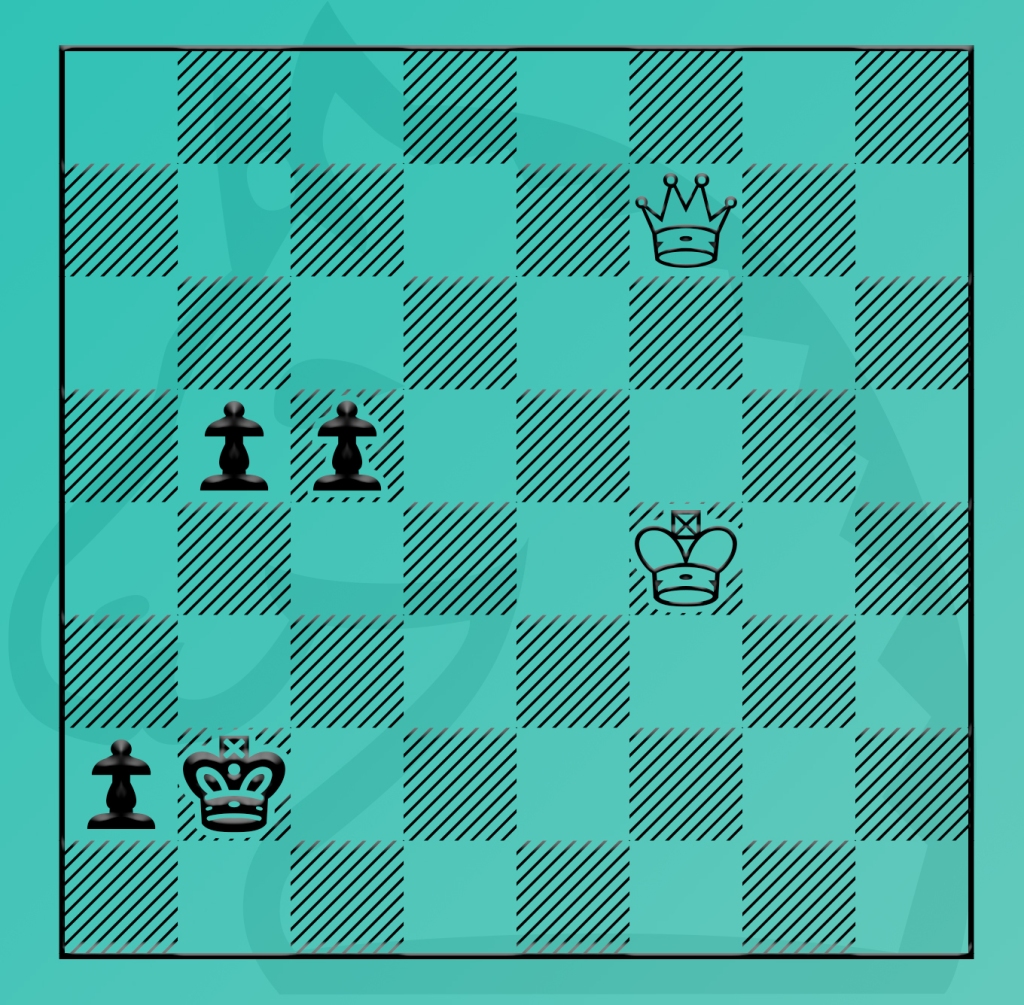
[Berger, 1922]


1.Qg8+ Kf2
(1…Kh1 2.Qg3 a3 3.Qf2 a2 4.Qf1#) 2.Qh7 Kg3 3.Qg6+ Kf2 4.Qe4 Kg3 (4…a3 5.Qh1 ; 4…Kg1 5.Qg4+ Kf2 6.Qh3 Kg1 7.Qg3+ Kh1 8.Qf2 +-) 5.Kc5 (5.Qh1 +-) 5…a3 6.Kd4 a2 7.Qh1 a1=Q+ 8.Qxa1 Kg2 9.Qb2+ Kg1 (9…Kg3 10.Qb7 +-) 10.Ke3 h1=Q 11.Qf2mate


And a few of you may know what to do if your opponent has these two pawns connected.


Rahman (2269)-Haque (2206)
United Insurance
Dhaka, 2007
1.Nf3 d6 2.g3 e5 3.c4 Bg4 4.Bg2 c6 5.Nc3 Nf6 6.d3 Nbd7 7.h3 Bh5 8.Nh4 Be7 9.O-O O-O 10.Rb1 a5 11.a3 Re8 12.b4 axb4 13.axb4 Bf8 14.b5 Qc7 15.Be3 Ra3 16.Rb3 Rea8 17.Qc2 d5 18.bxc6 bxc6 19.Bc1 Rxb3 20.Qxb3 d4 21.g4 Nc5 22.Qc2 dxc3 23.gxh5 Nxh5 24.Qxc3 Ra2 25.Be3 Ne6 26.Qb3 Ra3 27.Qb2 Nhf4 28.Rb1 Qa5 29.c5 Qc3 30.Qb8 Nxe2+ 31.Kh2 Ra1 32.Rb3 Qe1 33.Nf3 Qd1 34.Qxe5 Qxb3 35.Qxa1 Qxd3 36.Bf1 Qc3 37.Qa4 N2f4 38.Qxc6 Ng6 39.Qd5 Bxc5 40.Bxc5 Qxc5 41.Qxc5 Nxc5 42.Bc4 Ne4 43.Kg1 Kf8 44.Bd3 Nc5 45.Bc2 Nf4 46.Kh2 h6 47.Nd4 g6 48.Kg3 Nce6 49.Nc6 Ne2+ 50.Kg2 N2d4 51.Nxd4 Nxd4 52.Be4 f5 53.Bd3 g5 54.h4 Kg7 55.Kg3 g4 56.Kf4 Kf6 57.Bc4 Ne6+ 58.Kg3 Ke5 59.f3 h5 60.fxg4 hxg4 61.h5 Nf4 62.h6 Nh5+ 63.Kh4 Nf6 64.Bd3 Kf4 65.Bb5 Ke3 66.Kg5 g3 67.Bf1 f4 68.Kxf6 f3 69.h7 Kf2 70.h8=Q Kxf1


71.Qh3+ Kf2 72.Qh4 Kg2 73.Qe4 Kf2 74.Qc2+ Kf1 75.Qd3+ Kf2 76.Qd2+ Kf1 77.Qe3 Kg2 78.Qe4 Kf2 79.Qh4 Kg2 80.Qe4 Kf2 81.Kf5 g2 82.Kf4 g1=Q 83.Qc2+ Kf1 84.Qd1+ Kf2 85.Qd2+ Kf1 86.Kxf3 Qh1+ 87.Kg3 Qg1+ 1/2-1/2


(Well, maybe it’s not a win in all cases!)


But I assume no one has faced, with his sole queen, an endgame where your opponent has three pawns, all connected. It is extremely rare endgame and not too much research has been done on it.


Nevertheless, we can adopt some strategies and good ideas from other endings.


1) Do not expect an easy ending. While it is true that a queen versus three connected pawns has the advantage, maybe even a winning one, it does not always mean the victory will be an easy one.


2) Stalemates and draws are possible, and sometimes unavoidable. Still this is better than losing.


3) The win for the single Queen side is much easier when the pawns are not passed the fourth rank. The win, if still possible, is much harder when pawns are on the fifth to the seventh rank.


4) Keep, or get, your queen to position herself in front of the pawns.


5) Try to get your king close to the pawns. He can always pick up the stragglers.


6) The corollary of the above strategy is to keep the enemy king away from his own pawns. He can protect them or use his pawns to block a check.


7) If you are going to check, make sure your check moves the enemy king away from his pawn or your queen closer to the front of the pawns.


8) Assuming everything else is equal, try to win the middle pawn first. That way, the remaining pawns are now isolated.


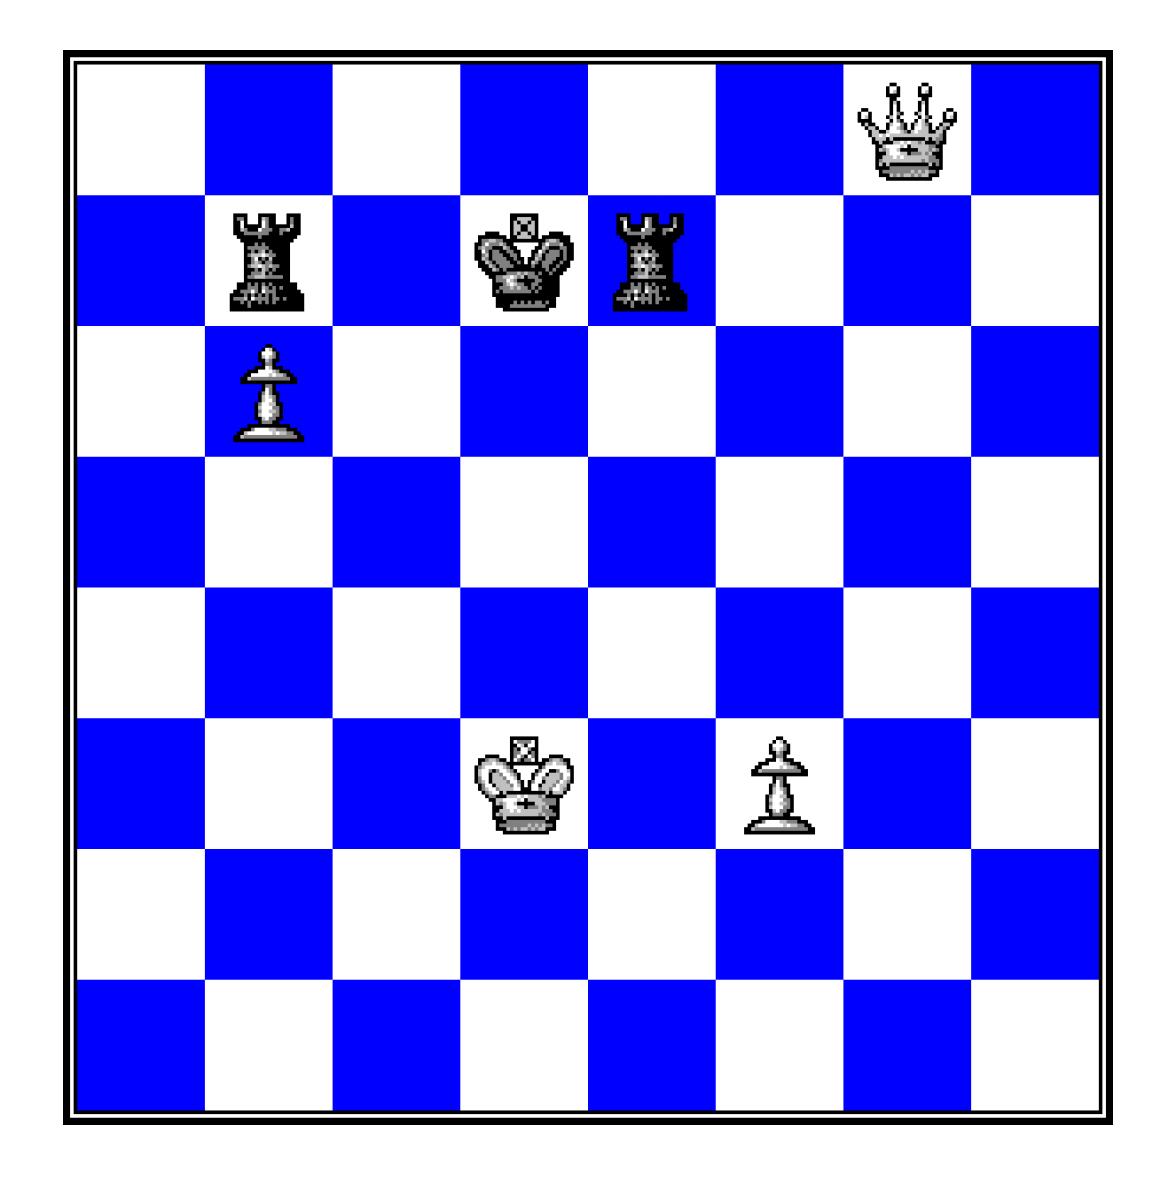
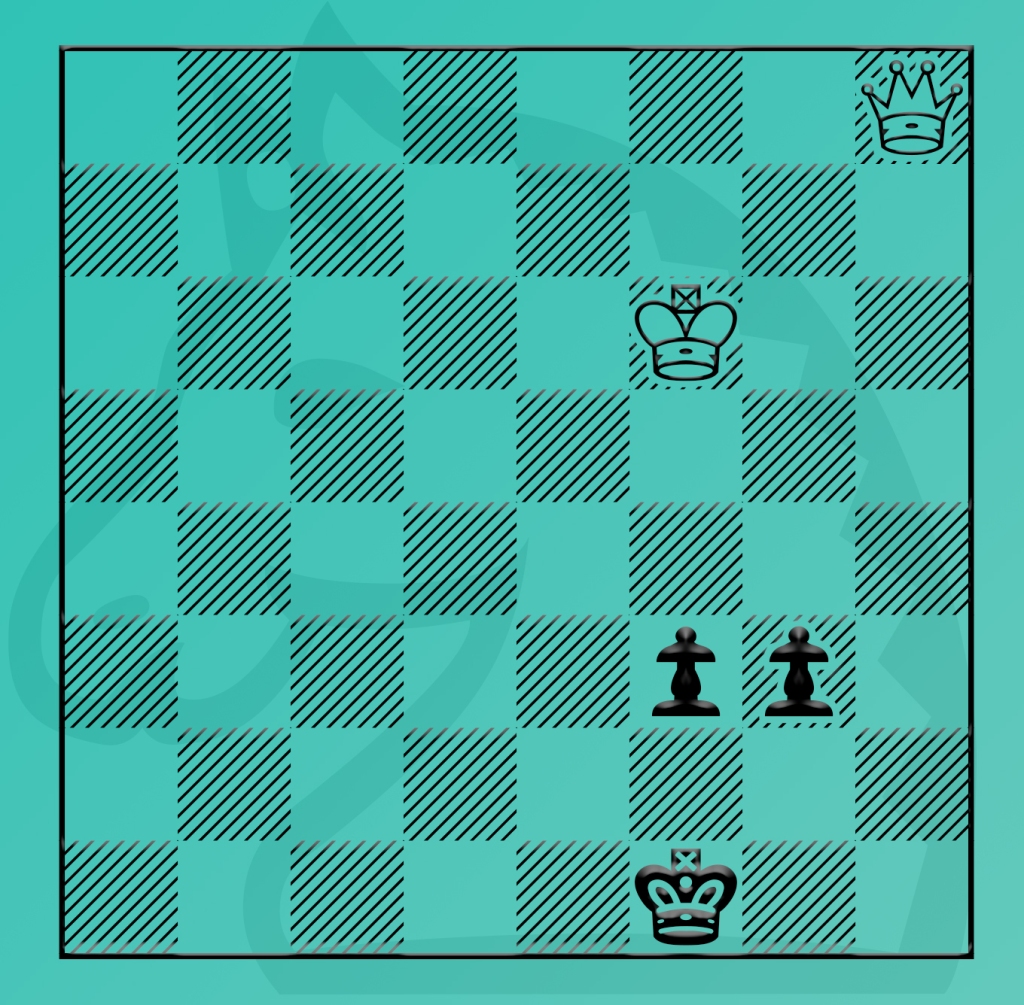
Here, Black has is ready to promote. White uses a staircase sequence to get his queen in front of the pawns. Note that all three pawns are on or past the fourth rank.


Ziatdinov (2467)-Blatny (2563)
World Open, 2003
[B06]
1.e4 g6 2.d4 c6 3.Nf3 Bg7 4.Nbd2 d5 5.c3 a5 6.Bd3 Na6
(Other moves in this crazy opening are 6…Nh6 and 6…e6.) 7.O-O Nc7 8.Re1 e6 9.Nf1 Ne7 10.h4 h6 11.Ng3 b6 12.Bf4 Ba6 13.Bxa6 Rxa6 14.Be5 O-O 15.Bxg7 Kxg7 16.Qd2 Ne8 17.Rad1 Ra7 18.Ne5 Nf6 19.h5 gxh5 20.Qe2 dxe4 21.c4 Qe8 22.Nxe4 Nxe4 23.Qxe4 f5 24.Qf3 Kh7 25.Nd3 Ng6 26.Qxh5 Rd7 27.Re3 Qf7 28.Rh3 Qg7 29.Rg3 Rxd4 30.Nf4 Rxf4 31.Rxg6 Qxg6 32.Rd7+ Qg7 33.Rxg7+ Kxg7 34.Qh2 e5 35.Qg3+ Kf6 36.Qe3 Rxc4 37.Qxh6+ Kf7 38.Qh7+ Ke6 39.Qg6+ Kd5 40.Qg7 Rd8 41.Qf7+ Kd4 42.Qxf5 Rd5 43.Qf3 Kc5 44.Qe3+ Rcd4 45.g4 Kb5 46.Qe2+ Rd3 47.Kf1 Kc5 48.g5 e4 49.Qxe4 Rd1+ 50.Ke2 R1d2+ 51.Ke3 Rxb2 52.g6 Rb4 53.Qe7+ Kb5 54.f3 Rb1 55.Kf4 a4 56.Qe3 Rb2 57.Kg3 Rdd2 58.Qe5+ Kb4 59.Qxb2+ Rxb2 60.g7 Rb1 61.Kg2 Rb2+ 62.Kh3 Rxa2 63.g8=Q Rc2 64.Qd8 b5 65.Qd1 Kb3 66.Qb1+ Kc3 67.f4 a3 68.f5 a2 69.Qa1+ Kb3 70.f6 Rd2 71.Kg3 c5 72.f7 Rd8 73.Kf4 Rf8 74.Qg7 Rxf7+ 75.Qxf7+ Kb2


76.Qf6+ Kb1 77.Qf5+ Kb2 78.Qe5+ Kb1 79.Qe1+ Kb2 80.Qe2+ Kb1 81.Qxb5+ 1/2-1/2


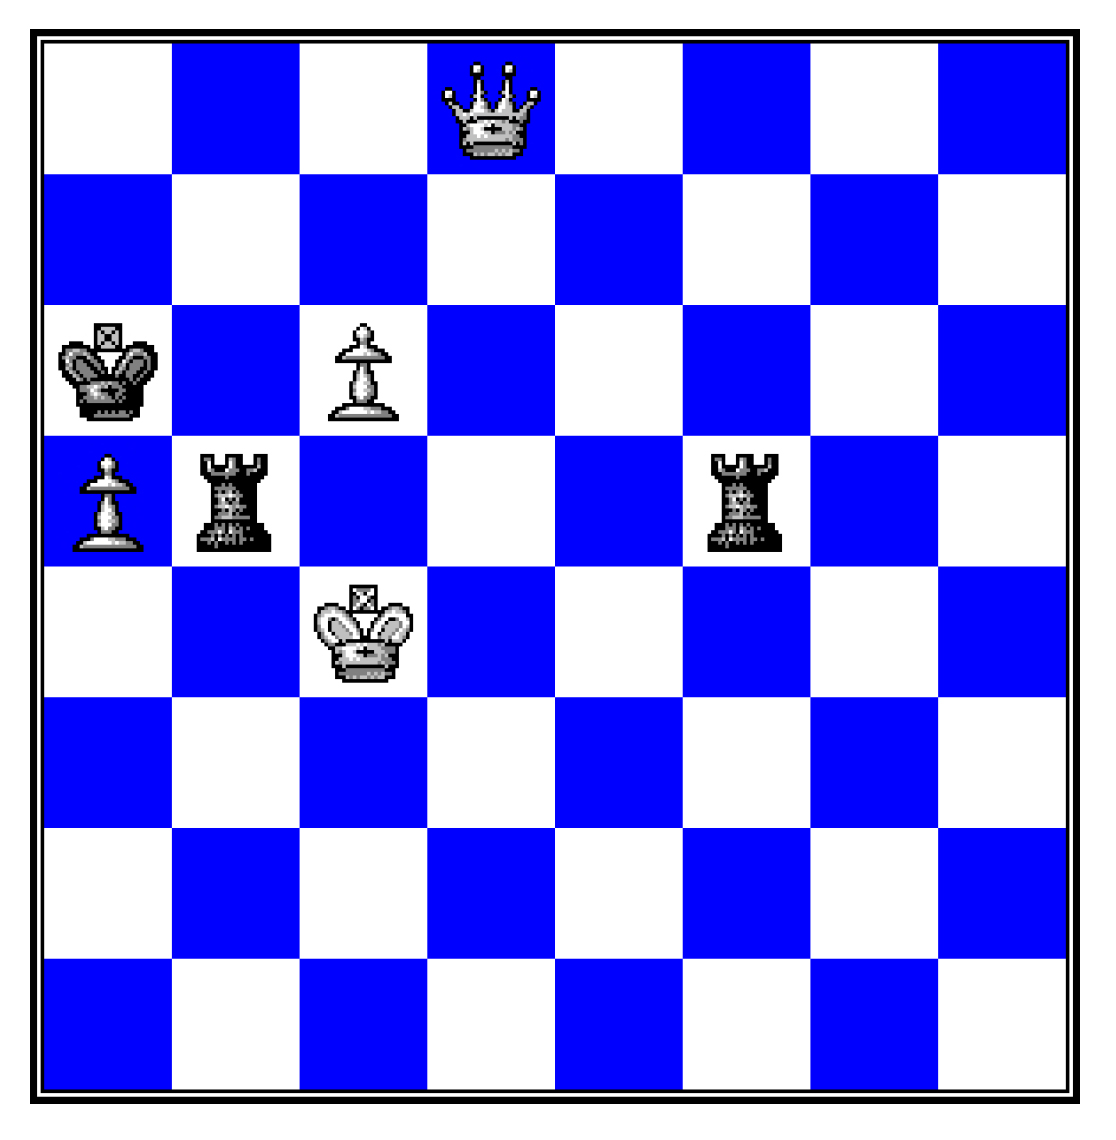
Black’s pawns are too far advanced for White to win. But Black is also in a bind, which means he can’t win either.
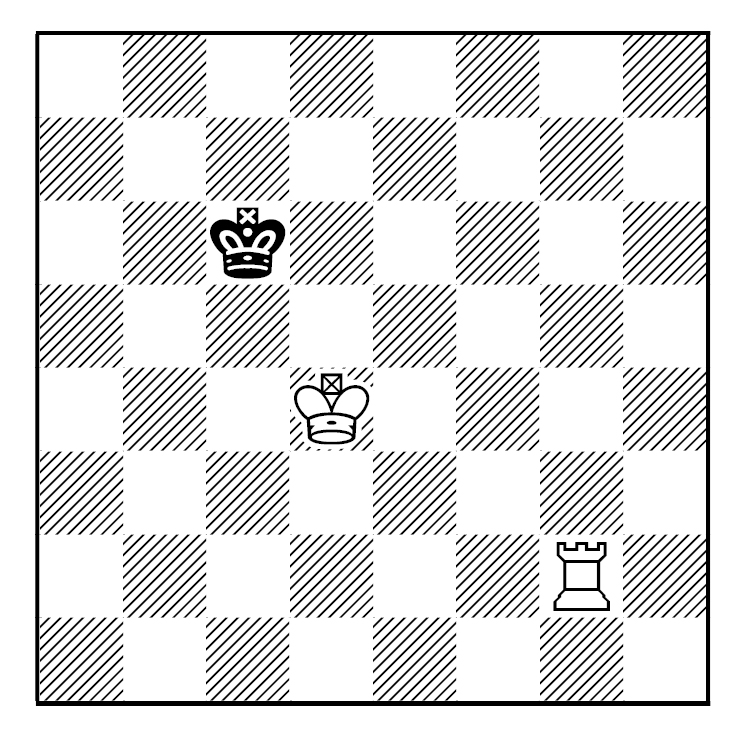

Gilg-Lamprecht
Karbitz, Aug. 18 1924


68…f1=Q! 69.Qxf1 h1=Q! 70.Qxh1=


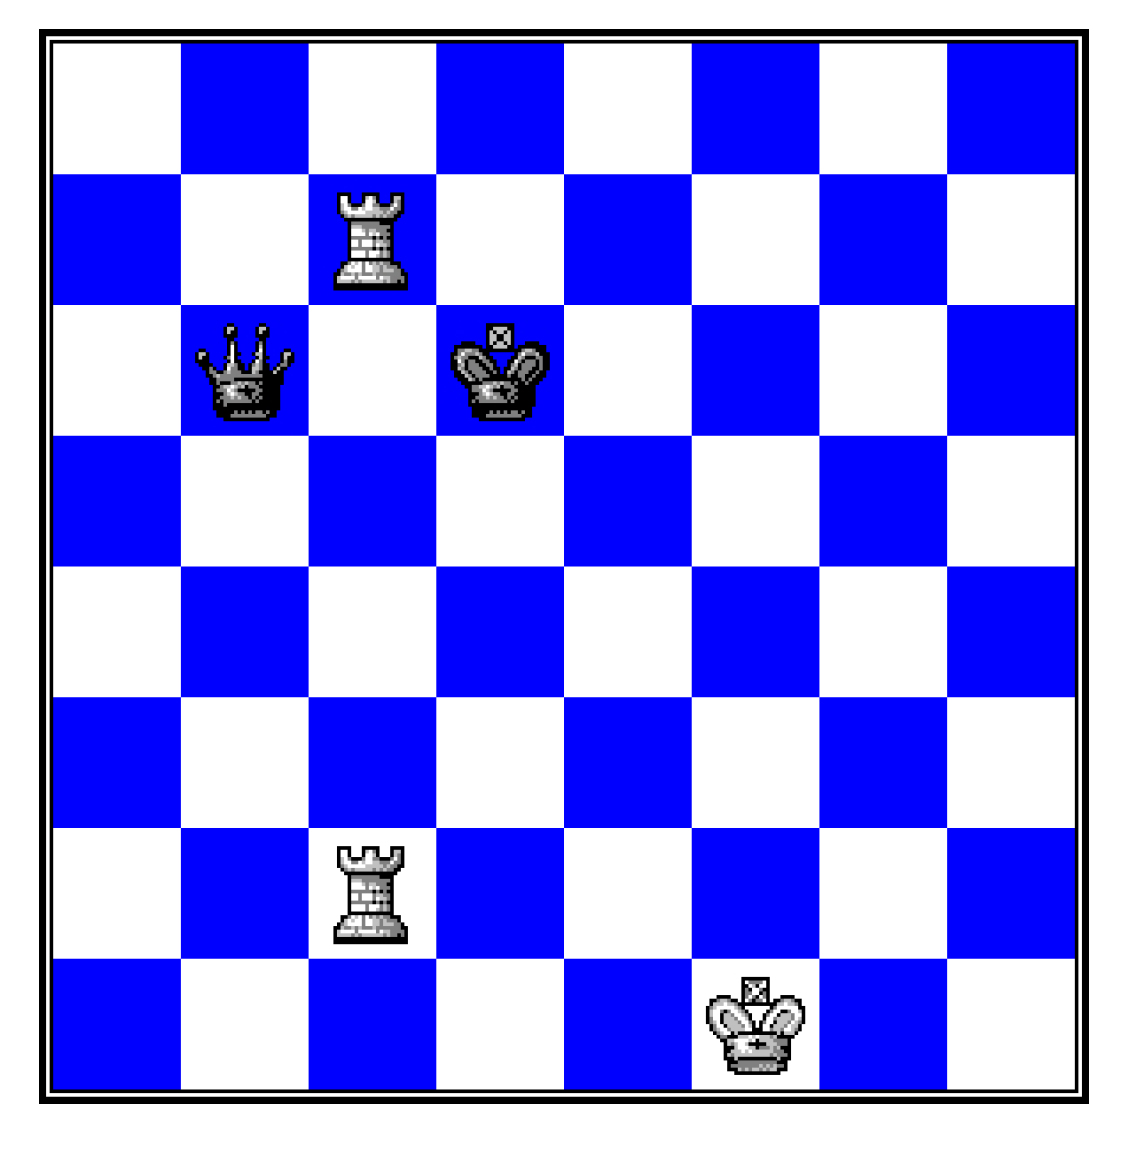
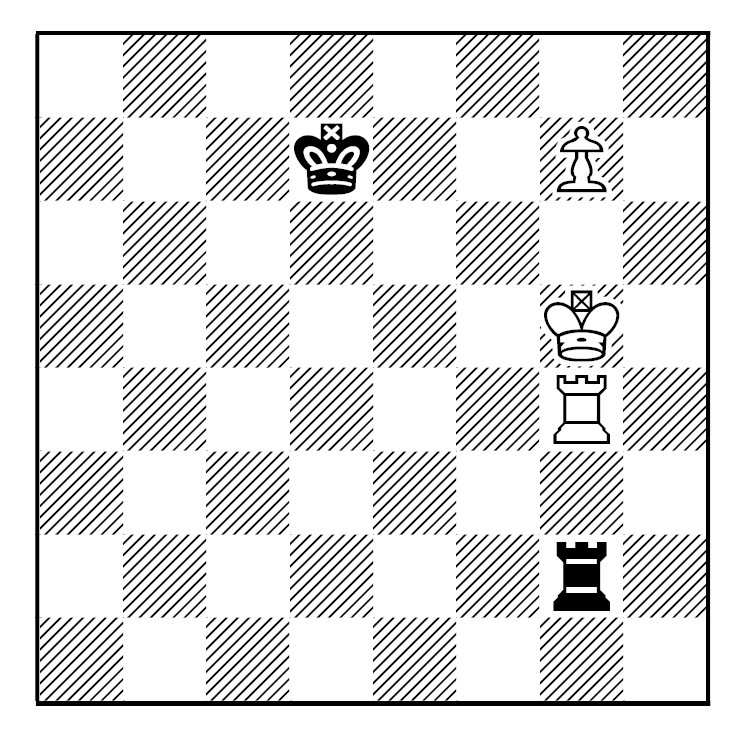
And what is the result if all three pawns are on the seventh rank? The one with the Queen has to be careful, and lucky!


White to Play and Draw
[Becker]


1.Qh3 d1=Q
(1…f1=Q 2.Qh4+ Qf2 3.Qh1+ Qf1 4.Qh4+ Kd1 5.Qa4+ =; 1…d1=N 2.Qg3 Ne3 3.Qxe3 f1=Q 4.Qc1+ Kf2 5.Qf4+ =) 2.Qc3+ Qd2 3.Qa1+ Qd1 4.Qc3+ Kf1 5.Qh3+ =

A Fun Story and Ending.

A few decades ago, before the invention of laptops and chess engines, I used to study chess on a large tournament-sized set.

 
During the warm summer nights California is known for, I would set up a playing board, along with notes and books, in the backyard.

 
This particular night I had just set up the board when I noticed a bright light zigzagging in the night. My eyes followed it and for some strange reason it noticed me. And it sped towards my backyard.


UFO_1


I wasn’t frightened, more curious than anything else. It’s not every day a strange, bright, flying, object settles in my backyard.


It was small thing and when the door opened a tiny being emerged. It (it could have been a male, female, or animal, or robot) began to talk with me. Now since I’m not a polyglot, nor do I know any extra-terrestrial languages, I didn’t understand everything this otherly-world being was trying to say.


But with some hand movements I got a general idea what this entity wanted to know. It (again, I’m sure what gender this being was or if it had a gender) wanted to know what I was doing with the tablecloth (the chessboard), and the little figurines (the pieces).

 
As I am happy to share the game with others, with adults, children, pets, and now aliens, I started to teach the game to it.

 
But this visitor, like so many other beginners, was impatient, and soon fell behind in material, key squares, position, and was on the wrong end of possible checkmates.

 
So here is the diagram which we eventually reached.

2019_05_15

1.Qa1+ Kxa1 (Obviously not 1…Ka3 due to 2.Qc3+ Ka4 3.Bb5+! Kxb5 4.Qc5+ Ka4 5.a8=Q+. My space-traveling friend, being a quick learner, figured this out and avoided it. Besides, there was another point to his move.)


2.Kc2 (with the idea of Bd4#) 2…h1=K!

(Whoa! I started to tell him that was an illegal move. To which he replied, “Didn’t you tell me that a pawn reaching the last rank, could become any piece? And I want another king”.

I had to admit he was right. What to do now? If I leave both kings on the board, it would seem likely I would stalemate one of them, and possibly both. I looked at his smug expression. It knew the problems I faced. But then I had moment of inspiration.)

 
3.a8=K! (Now he had at least one move that didn’t result in stalemate.) 3…Kb8 (forced.)

 
4.h7 Ka8 (again forced.)

5.h8=Q mate, mate, mate!

Self-Destruction or the Big “Z”

ZUGZWANG is the compulsion to move in chess, where any move would result in loss of position, material, or game.


A player who is forced into this type of position does not want to move as any move by that player only makes winning the game easier for his opponent. In other words, he is forced to self-destruct, literally move by move.

Here are a few (simple) examples.
“abdo10000”-Escalante
Blitz Game
chess.com, Feb. 4 2019
[White made a miscalculation in the middlegame enabling Black to win a bishop. White could resign, but chooses to play on.]

2019_02_14_A46.Kh1 (White puts his king in a stalemate position. Unfortunately for him, he still has pawns he can move.) 46…Kf3 (Black can achieve the same result by …Kg3 or …Kh3. The important thing is to keep the white king trapped in the corner, when he must move his pawns.) 47.a3 bxa3 48.c4 a2 49.c5 a1=Qmate 0-1


Here two more examples, slightly more sophisticated.


Jonny Hector (2465)-Sergei Tiviakov (2490)
Stockholm, 1990
1.e4 c5 2.Nf3 d6 3.d4 cxd4 4.Nxd4 Nf6 5.Nc3 g6 6.Bc4 Bg7 7.h3 (A waiting move. More common is 7.Bb3.) 7…a6 8.O-O b5 9.Bb3 Bb7 10.Re1 O-O 11.Bg5 Nbd7 12.Nd5! (White usually does well if he can get this move in.) 12…Rc8 13.Qd2 Rc5 14.Nf3 Re8 15.c3 Qa8 16.Rad1 Nxd5 17.exd5 Nf6 18.Be3 Rxd5 19.Bxd5 Bxd5 20.Nh4 Bxa2 21.Bh6 Bh8 22.f4 Bb3 23.Ra1 Ne4 24.Qe3 Bd5 25.Qb6 Bb7 26.Re3 Bf6 27.Nf3 Ng3 28.Bg5 Nf5 29.Ree1 Bg7 30.Nh4 f6 31.Nxf5 gxf5 32.Bh4 Kf7 33.Re2 Bh6 34.Bg3 Qc8 35.Kh2 Qc4 36.Rf2 Qe4 37.Rf3 Qc6 38.Rxa6 Qxb6 39.Rxb6 Bxf3 40.gxf3 Ra8 41.Rxb5 Ra2 42.Kg1 Bf8 43.c4 Ra1+ 44.Kf2 Rc1 45.b3 Rc2+ 46.Kf1 h5 47.Rxf5 Rc3 48.Rb5 h4 49.Bf2 Bh6 50.f5 Rc1+ 51.Kg2 Rc2 52.f4 Bxf4 53.Kf3 Bg3 54.Be3 (White is still winning after 54.Bxg3 hxg3 55.Kxg3 Rc3+ 56.Kg4. The text move keeps the tension on the board.) 54…Be1 55.Rb8 Rh2 56.Bh6 e5 57.Rb7+ Ke8 58.Bg7 Rxh3+ 59.Ke4 Kd8 60.Bxf6+ Kc8 61.Rh7 Rxb3 62.Kd5 Rb7 63.Rh8+ Kd7 64.Bxh4! Bxh4 65.Rh7+ Be7 66.f6 Ke8 67.Ke6 d5 68.c5 Rc7 69.Rxe7+ Rxe7+ 70.fxe7
2019_02_14_B
1-0


Of course, such self-destruction is not limited to pawns only endgames.


GM Spassky-GM Fischer
World Ch.
Reykjavik, July 11 1972
Game 1
1.d4 Nf6 2.c4 e6 3.Nf3 d5 4.Nc3 Bb4 5.e3 O-O 6.Bd3 c5 7.O-O Nc6 8.a3 Ba5 9.Ne2 dxc4 10.Bxc4 Bb6 11.dxc5 Qxd1 12.Rxd1 Bxc5 13.b4 Be7 (This position is more or less drawish. Mariotti-Tatai, Match, Rome, 1972 continued with 14.Nfd4 Bd7 15.Bb2 Nxd4 16.Nxd4 Rac8 17.Rac1 Rfd8 18.Bb3 Kf8 19.Rxc8 Rxc8 20.Rc1 Rxc1+ 21.Bxc1 1/2-1/2. Spassky’s move is more dynamic.) 14.Bb2!? Bd7 15.Rac1 Rfd8 16.Ned4 Nxd4 17.Nxd4 Ba4 18.Bb3 Bxb3 19.Nxb3 Rxd1+ 20.Rxd1 Rc8 21.Kf1 Kf8 22.Ke2 Ne4 23.Rc1 Rxc1 24.Bxc1 f6 25.Na5 Nd6 26.Kd3 Bd8 27.Nc4 Bc7 28.Nxd6 Bxd6 29.b5 Bxh2?? (Black, who is the aspiring to be the next world champion, makes a horrible beginner’s move. Black never recovered in this game. And didn’t show up for the next one. Only two games into the match and Bobby was down 0-2. The fact that he won this match, and the world championship, is simply incredible.) 30.g3 h5 31.Ke2 h4 32.Kf3 Ke7 33.Kg2 hxg3 34.fxg3 Bxg3 35.Kxg3 Kd6 36.a4 Kd5 37.Ba3 Ke4 38.Bc5 a6 39.b6 f5 40.Kh4 f4 41.exf4 Kxf4 42.Kh5 Kf5 43.Be3 Ke4 44.Bf2 Kf5 45.Bh4 e5 46.Bg5! e4 47.Be3 Kf6 48.Kg4 Ke5 49.Kg5 Kd5 50.Kf5 a5 51.Bf2 g5 52.Kxg5 Kc4 53.Kf5 Kb4 54.Kxe4 Kxa4 55.Kd5 Kb5 56.Kd6

2019_02_14_C

(White can play Kc7 protecting his pawn while attacking Black’s. Black has no choice but to play 56..Ka6. White will reply with Bd4 and Black can either give up protecting his pawn. or run his pawn down the a-file, and wait for White to play an eventual Bxa1. And then Black has to give up the a6 square.)

1 Q vs. 2 R

I like heavy endings, that is with queens and rooks. Not too many books deal with these types of endings, leaving the student with many questions unanswered.


Here is one type that interests me. It comes in form of a question.


Which is stronger in the endgame, a queen or two rooks? Here’s an introduction.


Let’s first look at four well-established guidelines for these types of endings.


(1) If the rooks are not connected, then the side with the single queen has the advantage.


(2) If the rooks are connected, then that side has the advantage.


(3) The advantage always lies with the player who has the initiative.


(4) Having the advantage that does not mean that side can win the game.


Here’s the first example.


Wilson-Thompson
Detroit, 1990
[White, with the single queen, is the one with the initiative but cannot break through the Black’s defence. Neither side is in real danger as Queen versus two connected Rooks endings, with nothing else on the board, are almost always drawn.]
1.e4 e5 2.Nf3 Nc6 3.Bc4 Nf6 4.Ng5 d5 5.exd5 Na5 6.Bb5+ c6 7.dxc6 bxc6 8.Qf3 Rb8 9.Bxc6+ Nxc6 10.Qxc6+ Nd7 11.d4 Be7 12.Nf3 Rb6 13.Qa4 exd4 14.O-O (Tempting is 14.Nxd4. But after 14… Rb4 15.Nc6 Rxa4 16.Nxd8 Bxd8, Black wins a piece. And after 14.Qxd4 O-O 15.O-O Bc5, White’s queen gets kicked around.) 14…O-O 15.a3 Bf6 16.b4 Ba6 17.Re1 Bc4 18.Qxa7 Qc8 19.Bf4 Rb7 20.Qa5 Bb5 21.Bg5 Bxg5 22.Nxg5 Nb8 23.Ne4 Nc6 24.Nd6 Qd7 25.Qxb5 [Surely better is 25.Nxb5 Ra7 (25…d3 26.cxd3 Rxb5 27.Qxb5 Qd4 28.Nd2) 26.Qb6 Rb8 27.Qc5 +-] 25…Rxb5 26.Nxb5 Nxb4 27.Nxd4 Qxd4 28.c3 Qf6 29.axb4 g6 30.Ra2 Rd8 31.Rc2 Qe6 32.Rec1 Qe4 33.Nd2 Qe2 34.Nf1 Qb5 35.Rb2 Qg5 36.Rbb1 f5 37.c4 f4 38.Rc3 Qf5 39.Rbc1 Rb8 40.Rb3 Qg5 41.Rcb1 Qf5 42.c5 g5 43.h3 h5 44.c6 Qb5 45.Rc3 Kf7 46.Rc5 Qd3 47.c7 Rc8 48.Rbc1 g4 49.R1c3 Qb1 50.hxg4 hxg4 51.R5c4 Qf5 52.g3 fxg3 53.Nxg3 Qd5 54.Rc5 Qd1+ 55.Kg2 Qa4 56.b5 Qa8+ 57.Kg1 Ke6 58.Rc6+ Kd7 59.Ne4 Qa1+ 60.Kg2 Qb1 61.Nf6+ Ke7 62.b6 Rh8 63.Rc1 (63.Nd5+ Kf7 64.Rf6+ Kg7) 63…Qf5 64.Ng8+ Rxg8 65.c8=Q Rxc8 66.Rxc8 Qf3+ 67.Kg1 g3 68.R8c7+ Kd6 69.R1c2 gxf2+ 70.Kf1 Qd3+ 71.Kxf2 Qd4+ 72.Kf1 Qxb6

 2019_02_07_A

 73.R7c3 (Simply 73.Rc6+ draws.) 73…Qb5+ 74.Ke1 Qe5+ 75.Kd1 Qh5+ 76.Re2 [76.Kc1 Qh1+ (76…Qg5+ 77.Kd1 Qg1+ 78.Kd2 Kd5 79.Rc5+ Kd4 80.R5c4+ Kd5 81.Rc5+) 77.Kb2 Qb7+ 78.Kc1]76…Qh1+ 77.Kc2 Qa1 78.Rd3+ Kc5 79.Rb3 Qa2+ 80.Rb2 Qa4+ 81.Kc1 Qa1+ 82.Kc2 Qa4+ 83.Kd2 Qd4+ 84.Kc1 Qf4+ 85.Kb1 Qf1+ 86.Ka2 Qf7+ 87.Rb3 Qa7+ 88.Kb2 Qg7+ 89.Rc3+ Kb4 90.Re4+ Kb5 91.Rc4 Qe5 92.Rc8 [Again, a simple draw can be found with a check (92.Rc5+ =)]92…Qe2+ 93.Rc2 Qe5+ 94.Kb1 Qe1+ 95.Kb2 Qe5+ 96.R2c3 Qe2+ 97.Ka3 Qe7+ 98.Ka2 Qe2+ 99.Rc2 (99.Rc5+ is yet another draw.) 99…Qe6+ 100.Kb1 Qe1+ 101.Kb2 Qe5+ 102.R2c3 Qe2+ 103.Kb1 Qe1+ 104.Ka2 Qe2+ 105.Rc2 Qe6+ 106.Kb1 Qe1+ 107.Rc1 Qe4+ 108.R8c2 (Passive, but still enough to draw. 108.R1c2 is better, as White still has a possible check if necessary.) 108…Kb4 109.Ka1 Qd4+ 110.Ka2 Qd5+ 111.Kb1 Qd3 112.Kb2 Qd4+ 113.Ka2 Qd5+ 114.Ka1 Qd4+ 115.Kb1 Qd3 116.Kb2 Qd4+ 117.Kb1 Qd3 118.Kb2 Qd4+ 119.Ka2 Qd5+ 120.Kb1 Qd3 1/2-1/2


Adding a single pawn to either side obviously increases the chances for that side. The plan should always try to push the pawn towards a promotion.


Adding two isolated pawns to the side with the Queen, the result is almost always a win, even without a promotion.


Lausch-Zajontz
corres., 1991
1.e4 e5 2.Nf3 Nc6 3.Bc4 Bc5 4.c3 Nf6 5.d4 exd4 6.cxd4 Bb4+ 7.Nc3 Nxe4 8.O-O Bxc3 9.d5 Bf6 10.Re1 Ne7 11.Rxe4 d6 12.Bg5 Bxg5 13.Nxg5 h6 14.Qe2 hxg5 15.Re1 Kf8 16.Rxe7 Be6 17.Rxe6 fxe6 18.dxe6 Qf6 19.e7+ Ke8 20.Qc2 c6 21.Ba6 bxa6 22.Qxc6+ Kf7 23.Qd5+ Kg6 24.Re6 Rae8 25.Qxd6 Kf7 26.Rxf6+ gxf6 27.Qxa6 Rxe7 28.g3 Rc7 29.Qd6 Rhc8 30.Qd4 Rc1+ 31.Kg2 R8c7 32.h4 gxh4 33.Qxh4 R1c2 34.g4 Kg7 35.g5 fxg5 36.Qxg5+ Kf8 37.Qd8+ Kf7 38.b4 Ke6 39.Qg8+ Kf6 40.Qd5 Rg7+ 41.Kf3 Rcc7 42.Kf4 Rge7 43.a4 Kg7 44.b5 Kf8 45.f3 Ke8 46.a5 Rf7+ 47.Kg3 Rg7+ 48.Kf2 Rc2+ 49.Ke3 Re7+ 50.Kd3 Rcc7 51.Qg8+ Kd7 52.b6 axb6 53.axb6 Rb7

  2019_02_07_B

54.Qd5+ Ke8 55.Qc6+ Rbd7+ 56.Kc4 Kf8 57.f4 Rf7 58.f5 Kg7 59.Qg6+ Kf8 60.f6 Rb7 61.Qh6+ Kg8 62.Qg5+ Kf8 63.Qe5 Kg8 64.Kc5 Rf8 65.Qd5+ Rff7 66.Qf3 Kh7 67.Qg2 Kh6 68.Kc6 Rh7 69.Kd5 Rhf7 70.Ke6 1-0


GM Jansa (2455)-GM A. Soklov (2570)
Gausdal, 1990
[It would be hard to expand on the notation. GM Jansa annotated this ending in I/50, Ending # 13.]


2019_02_07_C

1…Ka7! [1…Rfc5+ 2.Kd4 Rxa5 (2…Ka7 3.Qe7+ +-) 3.Qa8+ +- ; 1…Rf4+? 2.Kd3 +-] 2.a6!? [2.c7 Rfc5+ 3.Kd4 Rd5+! 4.Qxd5 Rxd5+ 5.Kxd5 Kb7 6.Kd6 Kc8= ; 2.Qe7+ Ka6 3.c7 Rfc5+ 4.Kd4 Rd5+ 5.Ke4 Re5+ 6.Qxe5 Rxe5+ 7.Kxe5 Kb7=] 2…Rfc5+ (2…Kxa6? 3.Qa8+ Kb6 4.Qb7+ +- ; 2…Rbc5+? 3.Kd4 Kxa6 4.Qa8+ Kb6 5.Qb7+ Ka5 6.c7 +-) 3.Kd4 Kxa6? [3…Rxc6? 4.Qd7+ Kb6 5.Qb7+ ; 3…Rc1? 4.Qe7+! Kxa6 (4…Ka8 5.c7 +-) 5.Qa3+ +- ; 3…Rc2! 4.Qe7+ (4.c7 Rbc5= ; 4.Qc8!? Rbb2!=) 4…Kxa6 5.c7 Rbc5 6.Qxc5 Rxc5 7.Kxc5 Kb7=] 4.Qa8+ Kb6 5.Qb7+ Ka5 6.Qa7+ Kb4 7.Qe7! (7…Ra5 8.c7) 1-0


With two isolated pawns with the two rooks, a win for that side is the most likely outcome. But examples are hard to find. We’ll cover more in a later post.

An Interesting Game.

Wilson-Thompson
Detroit, 1990
Two connected rooks are slightly better than a single queen. The advantage lies with the player who has the initiative.

In this game, the White, with the single queen, is the one with the initiative but cannot break through the Black’s defence. White declines a few forced draws along the game, but is never in real danger.

1.e4 e5 2.Nf3 Nc6 3.Bc4 Nf6 4.Ng5 d5 5.exd5 Na5 6.Bb5+ c6 7.dxc6 bxc6 8.Qf3!? (The Bogolyubov continuation of the Two Knights Defence.) 8…Rb8 9.Bxc6+ Nxc6 10.Qxc6+ Nd7 11.d4 Be7 12.Nf3 (One interesting try is 12.Ne4!? But this lead to a Black victory in Leimkuhler-Heidsiek, corres., 1977/9. The game continued with 12.Ne4 Rb6 13.Qa4 O-O 14.O-O f5 15.Nc5 f4 16.Nxd7 Bxd7 17.Qxa7 Bb5 18.Re1 Bh4 19.c3 Bxf2+ 0-1.) 12…Rb6 13.Qa4 exd4 14.O-O (Tempting is 14.Nxd4. But after 14… Rb4 15.Nc6 Rxa4 16.Nxd8 Bxd8, Black wins a piece. And after 14.Qxd4 O-O 15.O-O Bc5, White’s queen gets kicked around.) 14…O-O 15.a3 Bf6 16.b4 Ba6 17.Re1 Bc4 18.Qxa7 Qc8 19.Bf4 Rb7 20.Qa5 Bb5 21.Bg5 Bxg5 22.Nxg5 Nb8 23.Ne4 Nc6 24.Nd6 Qd7 25.Qxb5 [Surely better is 25.Nxb5 Ra7 (25…d3 26.cxd3 Rxb5 27.Qxb5 Qd4 28.Nd2) 26.Qb6 Rb8 27.Qc5 +-] 25…Rxb5 26.Nxb5 Nxb4 27.Nxd4 Qxd4 28.c3 Qf6 29.axb4 g6 30.Ra2 Rd8 31.Rc2 Qe6 32.Rec1 Qe4 33.Nd2 Qe2 34.Nf1 Qb5 35.Rb2 Qg5 36.Rbb1 f5 37.c4 f4 38.Rc3 Qf5 39.Rbc1 Rb8 40.Rb3 Qg5 41.Rcb1 Qf5 42.c5 g5 43.h3 h5 44.c6 Qb5 45.Rc3 Kf7 46.Rc5 Qd3 47.c7 Rc8 48.Rbc1 g4 49.R1c3 Qb1 50.hxg4 hxg4 51.R5c4 Qf5 52.g3 fxg3 53.Nxg3 Qd5 54.Rc5 Qd1+ 55.Kg2 Qa4 56.b5 Qa8+ 57.Kg1 Ke6 58.Rc6+ Kd7 59.Ne4 Qa1+ 60.Kg2 Qb1 61.Nf6+ Ke7 62.b6 Rh8 63.Rc1 (63.Nd5+ Kf7 64.Rf6+ Kg7) 63…Qf5 64.Ng8+ Rxg8 65.c8=Q Rxc8 66.Rxc8 Qf3+ 67.Kg1 g3 68.R8c7+ Kd6 69.R1c2 gxf2+ 70.Kf1 Qd3+ 71.Kxf2 Qd4+ 72.Kf1 Qxb6

2018_12_12

73.R7c3 (Simply 73.Rc6+ draws.) 73…Qb5+ 74.Ke1 Qe5+ 75.Kd1 Qh5+ 76.Re2 [76.Kc1 Qh1+ (76…Qg5+ 77.Kd1 Qg1+ 78.Kd2 Kd5 79.Rc5+ Kd4 80.R5c4+ Kd5 81.Rc5+) 77.Kb2 Qb7+ 78.Kc1] 76…Qh1+ 77.Kc2 Qa1 78.Rd3+ Kc5 79.Rb3 Qa2+ 80.Rb2 Qa4+ 81.Kc1 Qa1+ 82.Kc2 Qa4+ 83.Kd2 Qd4+ 84.Kc1 Qf4+ 85.Kb1 Qf1+ 86.Ka2 Qf7+ 87.Rb3 Qa7+ 88.Kb2 Qg7+ 89.Rc3+ Kb4 90.Re4+ Kb5 91.Rc4 Qe5 92.Rc8 [Again, a simple draw can be found with a check (92.Rc5+ =)] 92…Qe2+ 93.Rc2 Qe5+ 94.Kb1 Qe1+ 95.Kb2 Qe5+ 96.R2c3 Qe2+ 97.Ka3 Qe7+ 98.Ka2 Qe2+ 99.Rc2 (99.Rc5+ is yet another draw.) 99…Qe6+ 100.Kb1 Qe1+ 101.Kb2 Qe5+ 102.R2c3 Qe2+ 103.Kb1 Qe1+ 104.Ka2 Qe2+ 105.Rc2 Qe6+ 106.Kb1 Qe1+ 107.Rc1 Qe4+ 108.R8c2 (Passive, but still enough to draw. 108.R1c2 is better, as White still has a possible check if necessary.) 108…Kb4 109.Ka1 Qd4+ 110.Ka2 Qd5+ 111.Kb1 Qd3 112.Kb2 Qd4+ 113.Ka2 Qd5+ 114.Ka1 Qd4+ 115.Kb1 Qd3 116.Kb2 Qd4+ 117.Kb1 Qd3 118.Kb2 Qd4+ 119.Ka2 Qd5+ 120.Kb1 Qd3 1/2-1/2

Bridge Building

Can White win from this diagram?

 
Yes, but his King must move backwards to attain the win. The process is known as Bridge Building and was discovered by Lucena in 1497.

2018_09_06_A

1.Re1+ (To chase the enemy king so White’s own king can eventually move out of g8.) 1…Kd7 2.Re4! (This is probably how the term “Bridge-Building” came about. The king and rook need to link up with each other.) 2…Kd6 3.Kf7 Rf2+ 4.Kg6 Rg2+ 5.Kf6 Rf2+ 6.Kg5 Rg2+ 7.Rg4 +-

2018_09_06_B

And the pawn is free to promote.

Two Dances Of The Endgame

QUEEN


If you are fortunate to be a Queen ahead at the end of the game, congratulations! It means that you should be able to checkmate the enemy King.


There are many books that can show you how to checkmate, but I prefer this method.


It’s called the dance of the Queen (or the Chess Tango).

2018_08_29_A

First of all, please note that the enemy King can only mated on the edge or corner of the board. We will let Black play first as this will show the method clearer than if White was to move.


Black moves away from of the side of the board and plays 1…Kd5.


Since Black did not move backwards, White just moves his King closer to the action; 2.Kg2. Black moves again with 2…Kc6, or one diagonal square backwards. White’s Queen moves in the same direction as the Black King, in other words she dances with him; 3.Qd4. We are now doing the tango.


Play might then continue as 3…Kc7 (one square backwards) 4.Qd5 (one square forwards) 4…Kb6 5.Kf3 Ka6 (one square to the side) 6.Qc5 (one square to the side) 6…Kb7 7.Qd6 Ka8.


At this point, The King is already on the Back rank, White’s bes plan is to let him just move along the back rank. So 8.Qd7 (watch out, 8.Qc7 is stalemate!) Kb8 9.Ke4 (White just moves his King closer) 9…Ka8 10.Kd5 Kb8 11.Kc6 Ka8 (what else?) 12.Qb7mate.


ROOK


This is only slightly harder to win. The enemy King again must be driven to the side or corner of the board. And both the King and Rook must do the tango.

2018_08_29_B

First of all, if it is White to move, he makes the dance floor smaller with 1.Rg5. Notice how the Black King simply cannot run away to b5. He is forced to dance.


So Black plays 1…Kb6. If Black King moves to c7 (one square backwards), the White Rook dances to g6 (again, one square forward).


Since the King has move to the side, White dance with his King with 2.Kc4. And so it goes on with 2…Ka6 3.Kb4 Kb6. And now that both Kings are so close enough to see each other (Kings have very bad eyesight), the Rook comes over to check up on them. Yes, its a bad pun, but 4.Rg6+ is the only way to make progress.


The rest of the game could continue as such: 4…Kc7 5.Kc5 (I want to keep my eye on you!) Kd7 6.Kd5 (to continue the dance!) Ke7 7.Ke5 Kf7 8.Ra6 (got to save the Rook!) Kg7 9.Kf5 Kh7 10.Kg5 Kg7 (he ran out of room!) 11.Ra7+ (needs to check up on the monarchs) Kg8 12.Kf6 Kh8 13.Kg6 Kg8 14.Ra8mate

A Queen Study

Wan Yunguo (2472)-P. Kotenko (2359)
Moscow Open
Russia, Feb. 1 2015
1.e4 e5 2.Nf3 Nc6 3.Bb5 a6 4.Ba4 d6 5.c4!? [This variation of the Ruy Lopez is quite rare. Its main purpose is to have a strong point at d5 and limit Black’s responses. Here is another game: 5.c4!? Nf6 6.Nc3 Bd7 7.d4 exd4 8.Nxd4 Be7 9.Nxc6 bxc6 10.O-O O-O 11.h3 Re8 12.Qf3 c5 13.Bc2 Bc6 14.Bd2 Nd7 15.Nd5 Bf6 16.Bc3 Bxc3 17.Qxc3 Nf8 18.Rfe1 Ne6 19.b4 a5 20.bxc5 Nxc5 21.Rad1 Qb8 22.Rb1 Qa7 23.e5 Rad8 24.Nf6+ gxf6 25.Qg3+ Kf8 26.exf6 Re5 27.Rxe5 dxe5 28.Qg7+ Ke8 29.Qg8+ Kd7 30.Bf5+ 1-0 (Ilia Smirin (2480)-Janis Klovans (2420), Baltic Republics Ch., Kuldiga, Latvia, 1987)] 5…Nf6 6.d3 Be7 7.h3 O-O 8.Be3 Nd7 9.Nc3 Bf6 10.Ne2 Re8 11.O-O Nf8 12.d4 exd4 13.Nfxd4 Nxd4 14.Bxd4 Rxe4 15.Qd3 Bf5 16.Bxf6 Qxf6 17.Ng3 Re5 18.Qf3 c6 19.Rad1 Qe6 20.Qc3 Rd8 21.Rfe1 Re8 22.Rxe5 dxe5 23.Qb4 b5 24.cxb5 axb5 25.Bb3 Qc8 26.Nxf5 Qxf5 27.Rd6 Rc8 28.Qc5 Qb1+ 29.Kh2 Qxb2 30.Qa7 Ng6 31.Bxf7+ Kh8 32.Bxg6 hxg6 33.Rxg6 e4 34.Qe7 Ra8 35.Rg4 Qf6 36.Qxe4 Kg8 37.Rf4 Qd6 38.g3 Rf8 39.Rxf8+ Kxf8 (The last two moves were played so White would reach a winning queen endgame. However, having a winning advantage does not mean an easy-to-win advantage.)

2018_07_05

40.Kg2 b4 (With both queens controlling the center the game is almost equal. Except White has an extra pawn.) 41.h4 c5 42.g4 g6 43.g5 Kg7 44.Kh3 Qc7 45.Qc4 Qe5 46.Kg2 Qc3 47.Qe4 c4 48.Qe7+ Kg8 49.Qe8+ Kg7 50.Qe7+ Kg8 (White of course could force a draw here. But he wants more. And advancing his pawns is the best way to increase his advantage.) 51.h5! gxh5 52.g6 Qg7 53.Qe6+ Kf8 54.Qd6+ Ke8 55.Qb8+ Ke7 56.Qxb4+ (If this move was not a check Black would have reasonable chances for a draw with …Qxg6+. This should be White’s method; willing to jostle for position and make a number of threats until it is safe for him to press his advantage.) 56…Kf6 57.Qxc4 Qxg6+ (Every pawn trade makes the position clearer to understand.) 58.Kh2 Qf5 59.Qd4+ Kg6 60.a4 Qa5 61.Qd3+ Kh6 62.Qe3+ Kg6 63.Qf4 Qd5 64.Qc7 Qf5 65.Qd6+ Kh7 66.Qd4 Qa5 67.Qd7+ Kh6 68.Qc6+ Kg7 69.Qb5 Qc7+ (Naturally White would win after a queen trade.) 70.Kg2 Qf4 71.Qd7+ Kh6 72.Qc6+ Kh7 73.Kf1 Qd4 74.Qc7+ Kh6 75.a5 Qd3+ 76.Kg1 h4 77.Qc6+ Kh5 78.a6 Qd4 79.Qe8+ Kg4 80.Qe6+ Kh5 81.Kg2 Qa1 82.Kh2 Qd4 83.Qe8+ Kg4 84.Qe2+ Kf5 85.Qf3+ Kg6 86.Kh3 Qa4 87.Qg4+ 1-0