Queen versus Three 3 Connected Pawns

Most of you know how to win a Queen versus a single pawn in the endgame. Some of you may also know how to do the same if your opponent has, not one, but two pawns in the endgame.


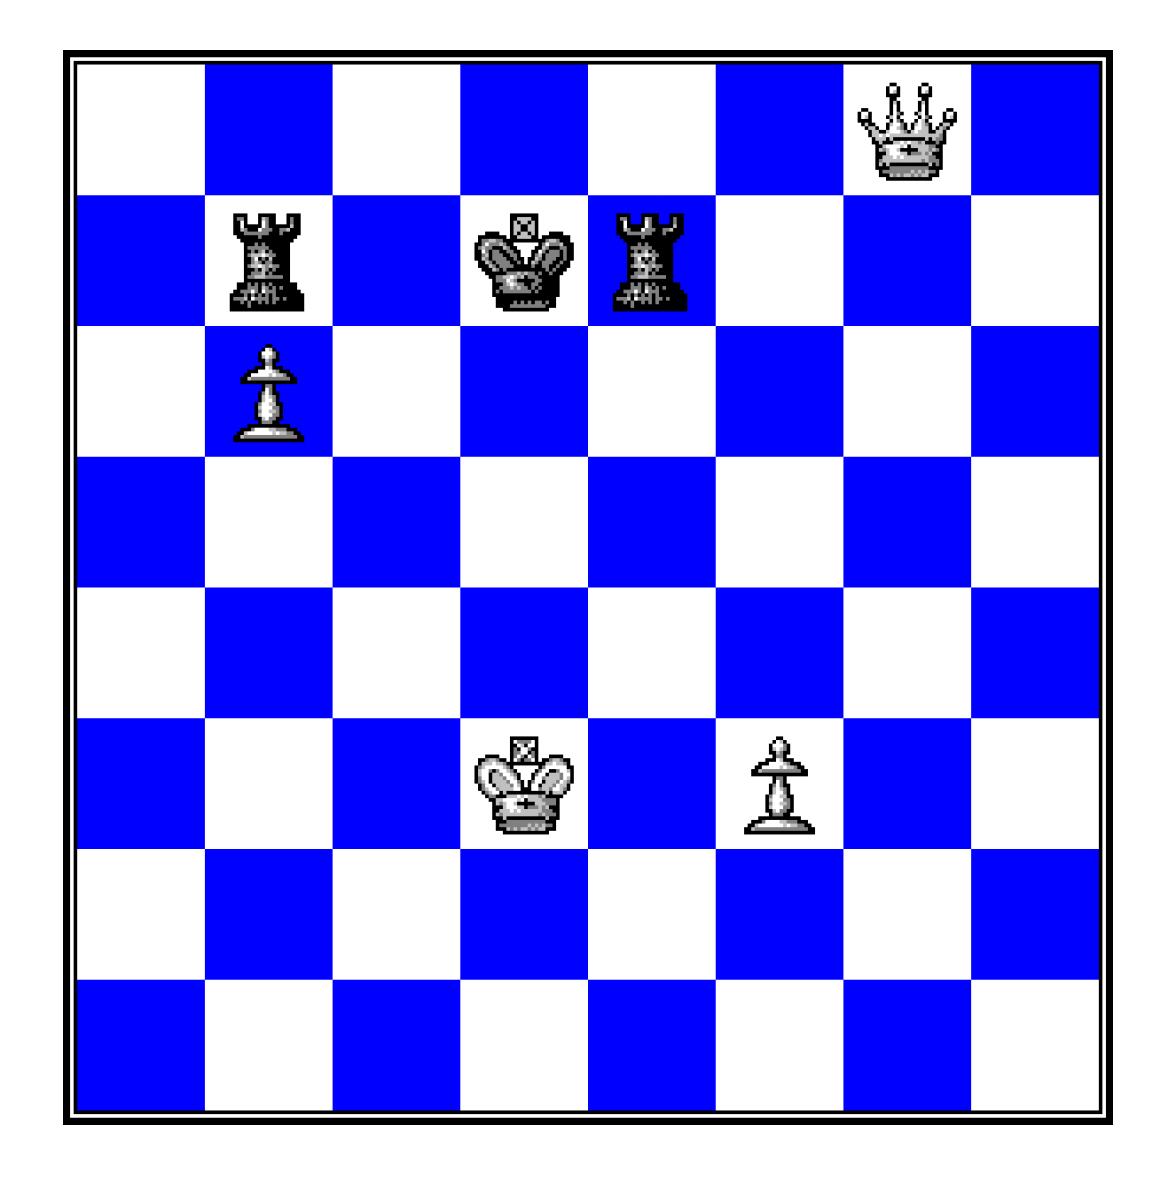
White to Play and Win
[Berger, 1922]


1.Qg8+ Kf2
(1…Kh1 2.Qg3 a3 3.Qf2 a2 4.Qf1#) 2.Qh7 Kg3 3.Qg6+ Kf2 4.Qe4 Kg3 (4…a3 5.Qh1 ; 4…Kg1 5.Qg4+ Kf2 6.Qh3 Kg1 7.Qg3+ Kh1 8.Qf2 +-) 5.Kc5 (5.Qh1 +-) 5…a3 6.Kd4 a2 7.Qh1 a1=Q+ 8.Qxa1 Kg2 9.Qb2+ Kg1 (9…Kg3 10.Qb7 +-) 10.Ke3 h1=Q 11.Qf2mate


And a few of you may know what to do if your opponent has these two pawns connected.


Rahman (2269)-Haque (2206)
United Insurance
Dhaka, 2007
1.Nf3 d6 2.g3 e5 3.c4 Bg4 4.Bg2 c6 5.Nc3 Nf6 6.d3 Nbd7 7.h3 Bh5 8.Nh4 Be7 9.O-O O-O 10.Rb1 a5 11.a3 Re8 12.b4 axb4 13.axb4 Bf8 14.b5 Qc7 15.Be3 Ra3 16.Rb3 Rea8 17.Qc2 d5 18.bxc6 bxc6 19.Bc1 Rxb3 20.Qxb3 d4 21.g4 Nc5 22.Qc2 dxc3 23.gxh5 Nxh5 24.Qxc3 Ra2 25.Be3 Ne6 26.Qb3 Ra3 27.Qb2 Nhf4 28.Rb1 Qa5 29.c5 Qc3 30.Qb8 Nxe2+ 31.Kh2 Ra1 32.Rb3 Qe1 33.Nf3 Qd1 34.Qxe5 Qxb3 35.Qxa1 Qxd3 36.Bf1 Qc3 37.Qa4 N2f4 38.Qxc6 Ng6 39.Qd5 Bxc5 40.Bxc5 Qxc5 41.Qxc5 Nxc5 42.Bc4 Ne4 43.Kg1 Kf8 44.Bd3 Nc5 45.Bc2 Nf4 46.Kh2 h6 47.Nd4 g6 48.Kg3 Nce6 49.Nc6 Ne2+ 50.Kg2 N2d4 51.Nxd4 Nxd4 52.Be4 f5 53.Bd3 g5 54.h4 Kg7 55.Kg3 g4 56.Kf4 Kf6 57.Bc4 Ne6+ 58.Kg3 Ke5 59.f3 h5 60.fxg4 hxg4 61.h5 Nf4 62.h6 Nh5+ 63.Kh4 Nf6 64.Bd3 Kf4 65.Bb5 Ke3 66.Kg5 g3 67.Bf1 f4 68.Kxf6 f3 69.h7 Kf2 70.h8=Q Kxf1
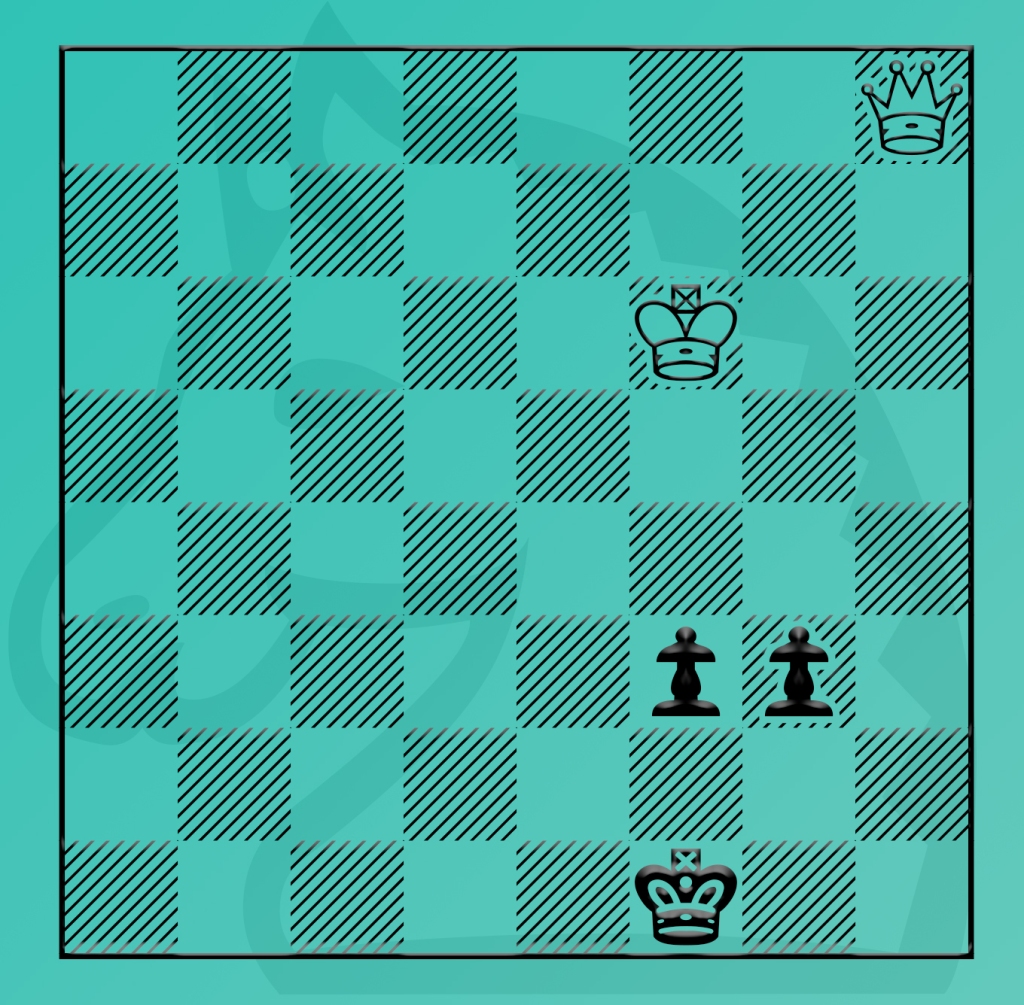

71.Qh3+ Kf2 72.Qh4 Kg2 73.Qe4 Kf2 74.Qc2+ Kf1 75.Qd3+ Kf2 76.Qd2+ Kf1 77.Qe3 Kg2 78.Qe4 Kf2 79.Qh4 Kg2 80.Qe4 Kf2 81.Kf5 g2 82.Kf4 g1=Q 83.Qc2+ Kf1 84.Qd1+ Kf2 85.Qd2+ Kf1 86.Kxf3 Qh1+ 87.Kg3 Qg1+ 1/2-1/2


(Well, maybe it’s not a win in all cases!)


But I assume no one has faced, with his sole queen, an endgame where your opponent has three pawns, all connected. It is extremely rare endgame and not too much research has been done on it.


Nevertheless, we can adopt some strategies and good ideas from other endings.


1) Do not expect an easy ending. While it is true that a queen versus three connected pawns has the advantage, maybe even a winning one, it does not always mean the victory will be an easy one.


2) Stalemates and draws are possible, and sometimes unavoidable. Still this is better than losing.


3) The win for the single Queen side is much easier when the pawns are not passed the fourth rank. The win, if still possible, is much harder when pawns are on the fifth to the seventh rank.


4) Keep, or get, your queen to position herself in front of the pawns.


5) Try to get your king close to the pawns. He can always pick up the stragglers.


6) The corollary of the above strategy is to keep the enemy king away from his own pawns. He can protect them or use his pawns to block a check.


7) If you are going to check, make sure your check moves the enemy king away from his pawn or your queen closer to the front of the pawns.


8) Assuming everything else is equal, try to win the middle pawn first. That way, the remaining pawns are now isolated.


Here, Black has is ready to promote. White uses a staircase sequence to get his queen in front of the pawns. Note that all three pawns are on or past the fourth rank.


Ziatdinov (2467)-Blatny (2563)
World Open, 2003
[B06]
1.e4 g6 2.d4 c6 3.Nf3 Bg7 4.Nbd2 d5 5.c3 a5 6.Bd3 Na6
(Other moves in this crazy opening are 6…Nh6 and 6…e6.) 7.O-O Nc7 8.Re1 e6 9.Nf1 Ne7 10.h4 h6 11.Ng3 b6 12.Bf4 Ba6 13.Bxa6 Rxa6 14.Be5 O-O 15.Bxg7 Kxg7 16.Qd2 Ne8 17.Rad1 Ra7 18.Ne5 Nf6 19.h5 gxh5 20.Qe2 dxe4 21.c4 Qe8 22.Nxe4 Nxe4 23.Qxe4 f5 24.Qf3 Kh7 25.Nd3 Ng6 26.Qxh5 Rd7 27.Re3 Qf7 28.Rh3 Qg7 29.Rg3 Rxd4 30.Nf4 Rxf4 31.Rxg6 Qxg6 32.Rd7+ Qg7 33.Rxg7+ Kxg7 34.Qh2 e5 35.Qg3+ Kf6 36.Qe3 Rxc4 37.Qxh6+ Kf7 38.Qh7+ Ke6 39.Qg6+ Kd5 40.Qg7 Rd8 41.Qf7+ Kd4 42.Qxf5 Rd5 43.Qf3 Kc5 44.Qe3+ Rcd4 45.g4 Kb5 46.Qe2+ Rd3 47.Kf1 Kc5 48.g5 e4 49.Qxe4 Rd1+ 50.Ke2 R1d2+ 51.Ke3 Rxb2 52.g6 Rb4 53.Qe7+ Kb5 54.f3 Rb1 55.Kf4 a4 56.Qe3 Rb2 57.Kg3 Rdd2 58.Qe5+ Kb4 59.Qxb2+ Rxb2 60.g7 Rb1 61.Kg2 Rb2+ 62.Kh3 Rxa2 63.g8=Q Rc2 64.Qd8 b5 65.Qd1 Kb3 66.Qb1+ Kc3 67.f4 a3 68.f5 a2 69.Qa1+ Kb3 70.f6 Rd2 71.Kg3 c5 72.f7 Rd8 73.Kf4 Rf8 74.Qg7 Rxf7+ 75.Qxf7+ Kb2
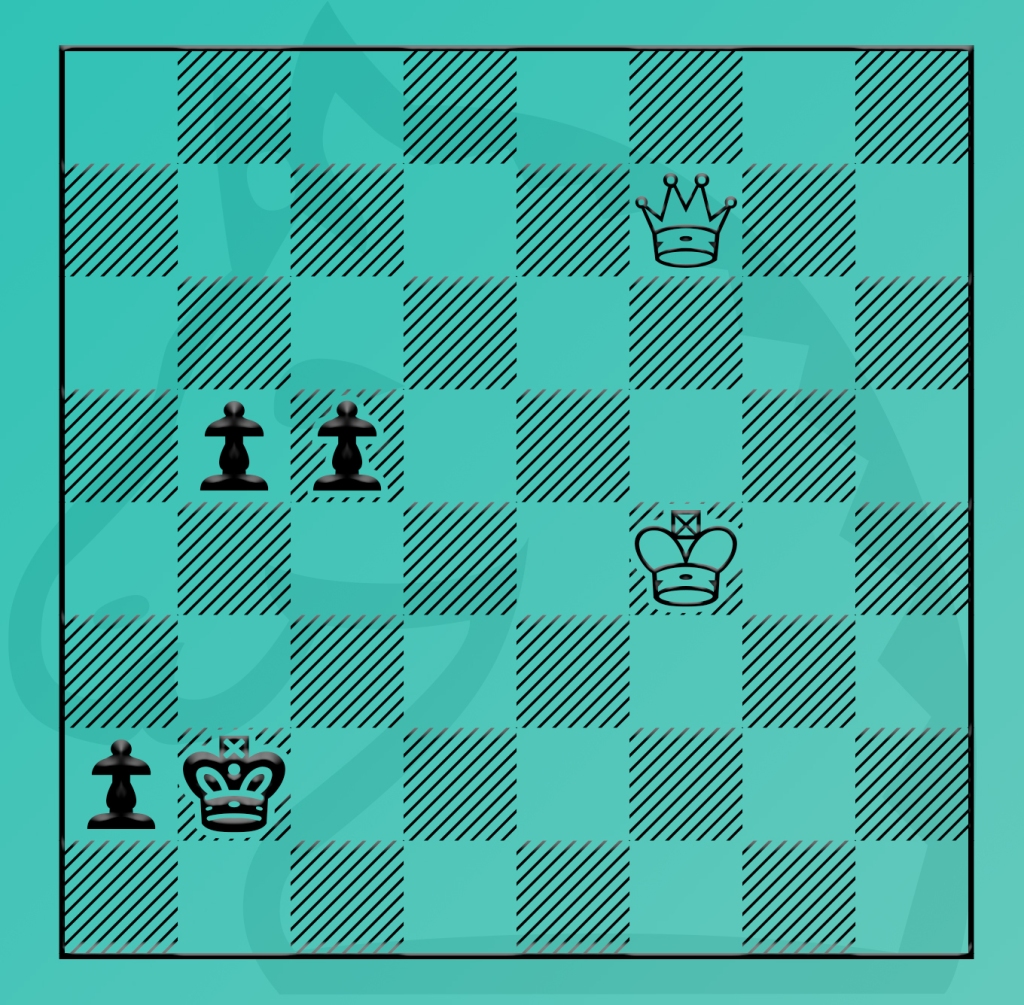

76.Qf6+ Kb1 77.Qf5+ Kb2 78.Qe5+ Kb1 79.Qe1+ Kb2 80.Qe2+ Kb1 81.Qxb5+ 1/2-1/2


Black’s pawns are too far advanced for White to win. But Black is also in a bind, which means he can’t win either.


Gilg-Lamprecht
Karbitz, Aug. 18 1924


68…f1=Q! 69.Qxf1 h1=Q! 70.Qxh1=


And what is the result if all three pawns are on the seventh rank? The one with the Queen has to be careful, and lucky!


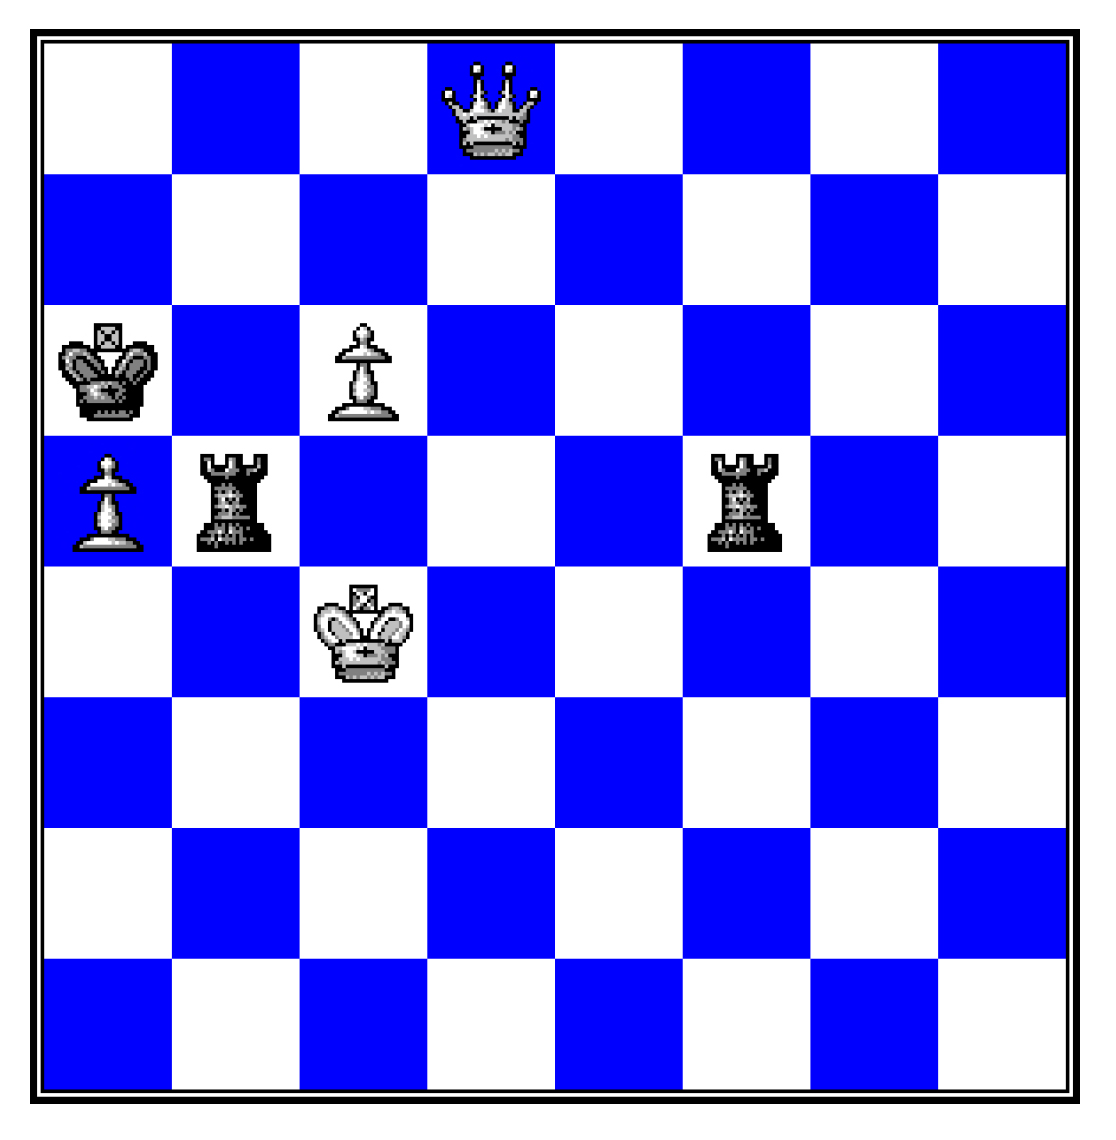
White to Play and Draw
[Becker]


1.Qh3 d1=Q
(1…f1=Q 2.Qh4+ Qf2 3.Qh1+ Qf1 4.Qh4+ Kd1 5.Qa4+ =; 1…d1=N 2.Qg3 Ne3 3.Qxe3 f1=Q 4.Qc1+ Kf2 5.Qf4+ =) 2.Qc3+ Qd2 3.Qa1+ Qd1 4.Qc3+ Kf1 5.Qh3+ =

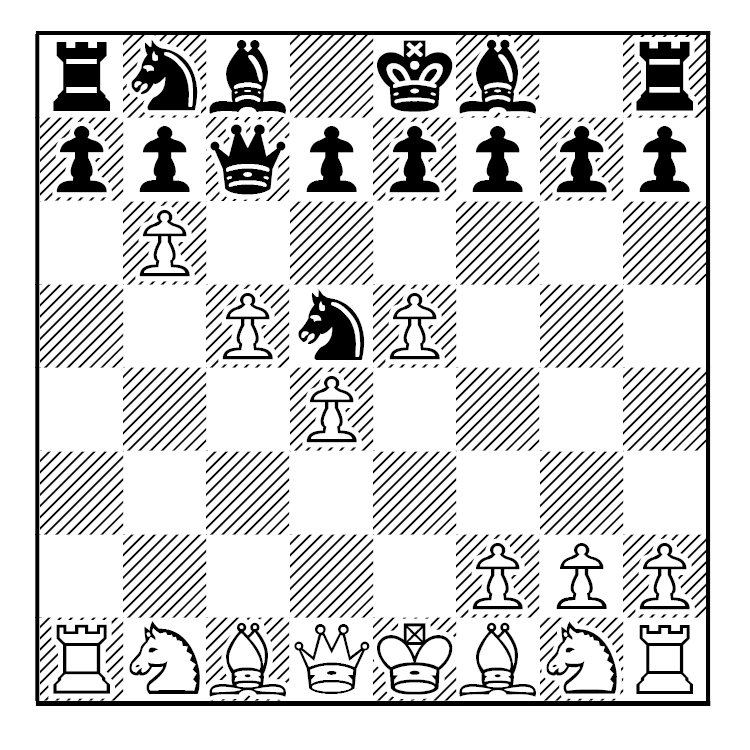
Pawn Pusher!

Sometimes beginners are referred, somewhat in jest, as being mere “pawn-pushers”. Try telling that to these Grandmasters.


Typically, most pawns are pushed towards the end of the game with the goal of eventually promoting. But pawns don’t need to promote and pawn pushing can happen at any stage of the game. In fact, it is possible to win a game with pawn moves only.

 
R. Kujoth – Fashing-Bauer
Milwaukee, 1950
1.e4 c5 2.b4 cxb4 3.a3 Nc6 4.axb4 Nf6 5.b5 Nb8

[The (in?)famous game, Frank Marshall-Viacheslav Ragosin, New York, 1940, continued instead with 5…Nd4 6.c3 Ne6 7.e5 Nd5 8.c4 Ndf4 9.g3 Ng6 10.f4 Ngxf4 11.gxf4 Nxf4 12.d4 Ng6 13.h4 e6 14.h5 Bb4+ (And now, after 14 moves, Marshall had to finally move a piece.) 15.Bd2 Bxd2+ 16.Nxd2 Ne7 17.Ne4 Nf5 18.h6 g6 19.Nf6+ Kf8 20.Nf3 d6 21.Ng5 dxe5 22.dxe5 Qxd1+ 23.Rxd1 Ke7 24.Rh3 b6 25.Bg2 Rb8 26.Ngxh7 1-0.]


6.e5 Qc7 7.d4 Nd5 8.c4 Nb6 9.c5 Nd5 10.b6!
2020_04_01_A

1-0


John Hurt (1831)-Morris Busby
Bluff City Open, February 17, 1979
1.e4 c5 2.b4 cxb4 3.a3 Nc6 4.axb4 Nf6 5.b5 Nd4 6.c3 Ne6 7.e5 Ne4 8.d4 d5 9.f3 N4g5 10.h4 1-0


Pawn pushing can be used in the middle game. To good effect.


GM Vassily Ivanchuk (2740)-GM Veselin Topalov (2670)
Investbanka
Belgrade, 1995
1.e4 c5 2.Nf3 d6 3.d4 cxd4 4.Nxd4 Nf6 5.Nc3 g6 6.Be3 Bg7 7.f3 Nc6 8.Qd2 O-O 9.Bc4 Bd7 10.h4 Rc8 11.Bb3 h5 12.O-O-O Ne5 (The Soltis Variation of the Dragon.) 13.Bg5 Rc5 14.g4 hxg4 15.f4 Nc4 16.Qe2 Qc8

[This appear to be Black’s best move. Sarunas Sulskis (2505)-Dr. Evarth Kahn (2350), Budapest 1995 continued with 16…b5!? 17.h5 Nxh5 18.f5 a5 19.Qxg4 a4 20.Bxc4 Rxc4 21.Rxh5 gxh5 22.Qxh5 Rxd4 23.Rh1 f6 24.Qh7+ Kf7 25.Bh6 Bxf5 26.Qxg7+ Ke6 27.exf5+ 1-0.]

17.Bxf6 Bxf6 18.Nd5 Rxd5!! (This move certainly looks like it gives the initiative to Black. Can it be sustained? Or is it an illusion? White several plans to try to counter Black’s threats. But first, the most obvious move.) 19.exd5 b5 20.h5 (Now here is where it starts to get complicated.) 20…g5!? (It’s obvious Black intends to push his kingside pawns. Doing so will put a cramp on both White’s attack on the kingside and more importantly, the coordination of his pieces.) 21.fxg5 Bxg5+! (Black will use the extra tempo to push another pawn.) 22.Kb1 f5 23.Rd3 (It’s been recommended that 23.h6, pushing White’s pawns to counter Black’s advancing pawns, is the better move.) 23…f4 24.Bxc4 Qxc4 0-1

2020_04_01_B

[Ivanchuk was criticized for resigning here. It’s not an easy position to hold. Some sample lines: (1) 25.Qd2 Kh7 26.Qg2 Kh8 27.b3 Qc8! Black’s king is hiding and his queen can reposition herself., (2) 25.Qg2 Kh8 26.Re1 b4 and Black’s queenside pawns start advancing, (3) 25.Rc3?! Qxd4 26.Rc7 Bf5 (a “fantasy” position for Black). In addition to Black’s dangerous kingside pawns he now has both bishops aiming for White’s castled position, (4) 25.Ne6?! fails to 25….f3! 26.Qd1 Bxe6. Maybe Ivanchuk saw all of this.]


Obviously, one has to be careful pushing pawns. When a pawn is advances it leaves holes where the enemy pieces can hold or attack.


The following games illustrates this point. And features some serious pawn pushing.


GM Boris Spassky-GM Bobby Fischer
World Ch., Game #13
Reykjavik, July 11 1972
1.e4 Nf6 2.e5 Nd5 3.d4 d6 4.Nf3 g6 5.Bc4 Nb6 6.Bb3 Bg7 7.Nbd2 (ECO gives this move a “?!”, suggesting 8.Ng5.) 7…O-O 8.h3!? (8.O-O!?) 8…a5! (To create space and threaten …a4.) 9.a4 dxe5 10.dxe5 Na6 11.O-O Nc5 (-/+ ECO) 12.Qe2 Qe8 13.Ne4 Nbxa4 14.Bxa4 Nxa4 15.Re1 Nb6 16.Bd2 a4 17.Bg5 h6 18.Bh4 Bf5 19.g4 Be6 20.Nd4 Bc4 21.Qd2 Qd7 22.Rad1 Rfe8 23.f4 Bd5 24.Nc5 Qc8 25.Qc3 e6 26.Kh2 Nd7 27.Nd3? c5! 28.Nb5 Qc6 29.Nd6 Qxd6 30.exd6 Bxc3 31.bxc3 f6 32.g5 hxg5 33.fxg5 f5 34.Bg3 Kf7 35.Ne5+ Nxe5 36.Bxe5 b5 37.Rf1 Rh8 38.Bf6 a3 39.Rf4 a2 40.c4 Bxc4 41.d7 Bd5 42.Kg3 Ra3+ 43.c3 Rha8 44.Rh4 e5 45.Rh7+ Ke6 46.Re7+ Kd6 47.Rxe5 Rxc3+ 48.Kf2 Rc2+ 49.Ke1 Kxd7 50.Rexd5+ Kc6 51.Rd6+ Kb7 52.Rd7+ Ka6 53.R7d2 Rxd2 54.Kxd2 b4 55.h4 Kb5 56.h5 c4 57.Ra1 gxh5 58.g6 h4 59.g7 h3 60.Be7 Rg8 61.Bf8! (Locking in the rook.)

2020_04_01_C

61…h2 62.Kc2 Kc6 63.Rd1 b3+ 64.Kc3 h1=Q 65.Rxh1 Kd5 66.Kb2 f4 67.Rd1+ Ke4 68.Rc1 Kd3 69.Rd1+ [Gligorić, writing in Informant 14, (Game #165) give this move a ??, claiming that 69.Rc3+! Kd4 70.Rf3 c3+ 71.Ka1 c2 72.Rxf4+ Kc3 73.Rf3+ Kd2 74.Ba3! is equal. He appears to be correct.] 69…Ke2 70.Rc1 f3 71.Bc5 Rxg7 72.Rxc4 Rd7 73.Re4+ Kf1 74.Bd4 f2 0-1

Easy Problems?

Chess problems are not supposed to be easy. After all, that is why they are known as “problems”.

 
Nevertheless, there are some problems that are easy to solve. One just has to know how the pieces move, add in a little logic thought, and the solution readily presents itself.

 
We’ll start with the easiest and move onto the ones that are a little more difficult (but still easy) to solve.


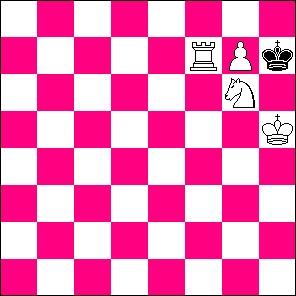
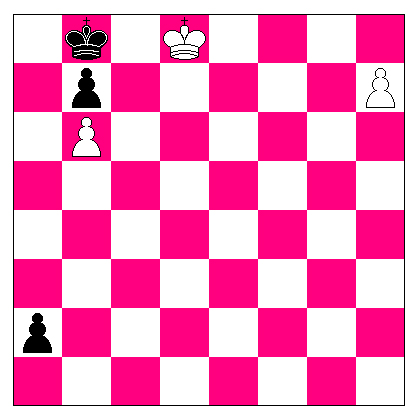
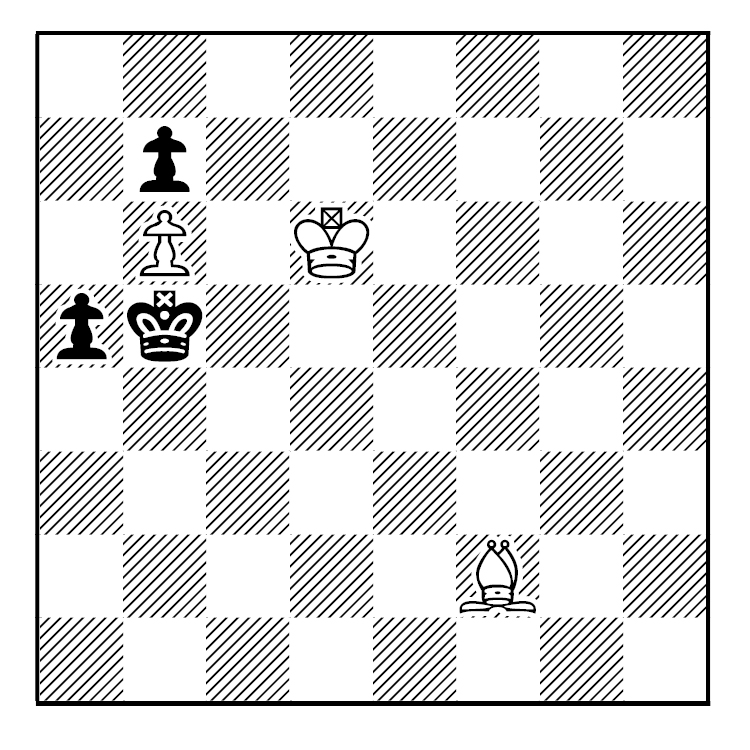
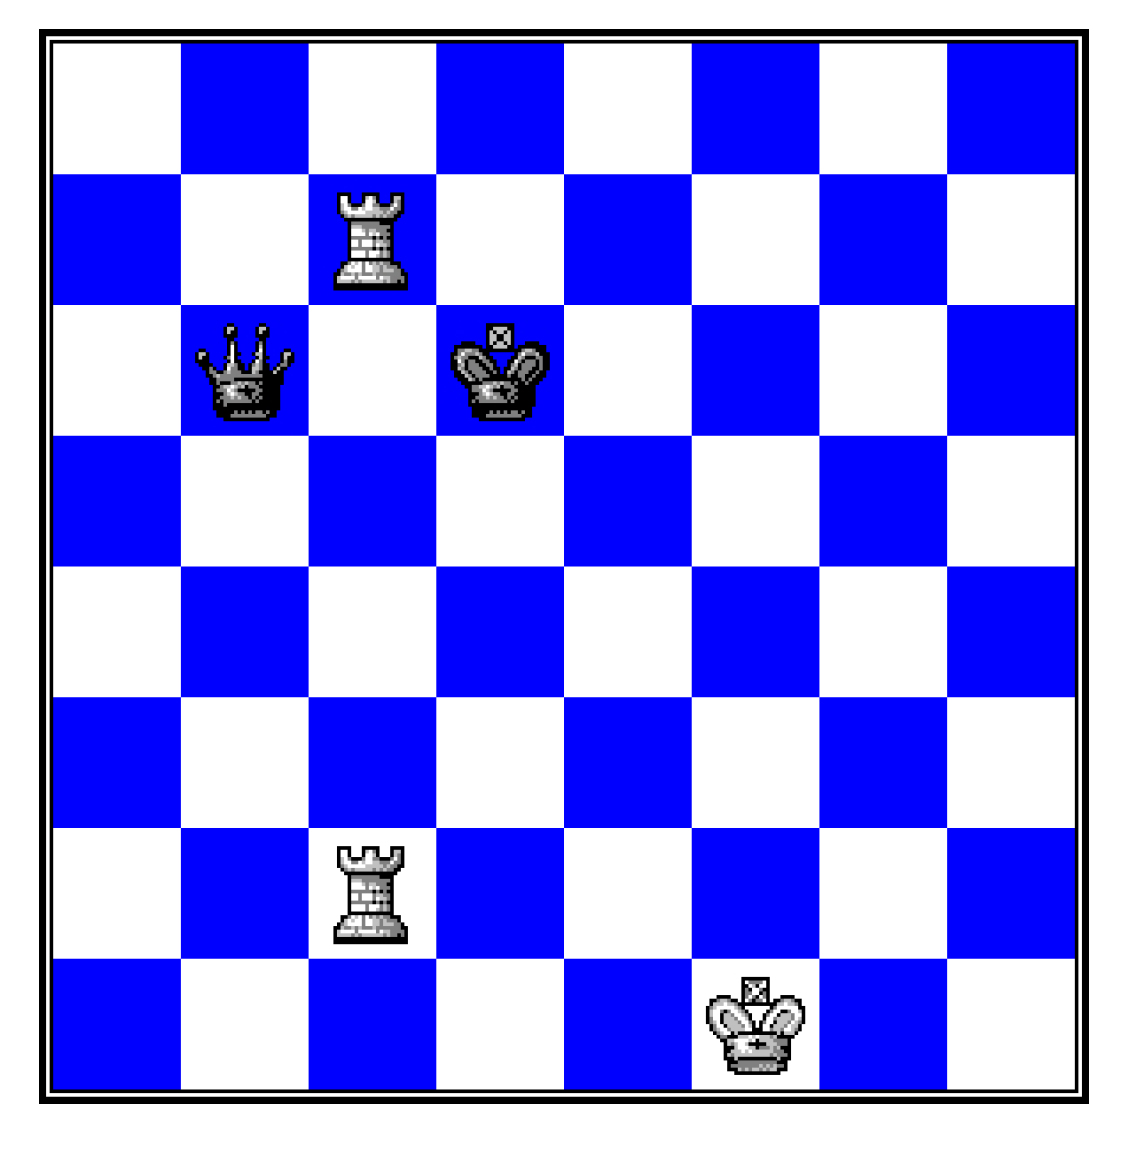
All are White to move and eventually mate.


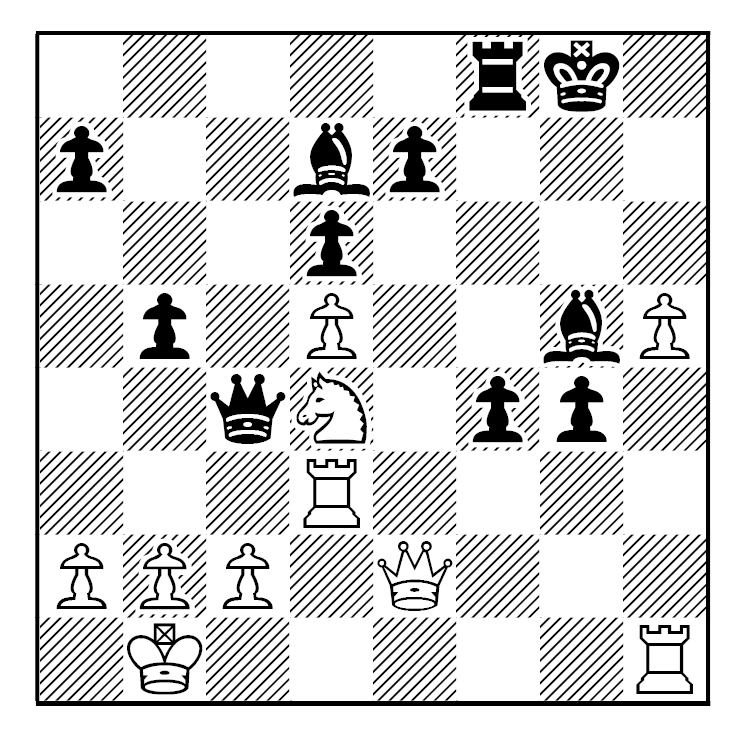
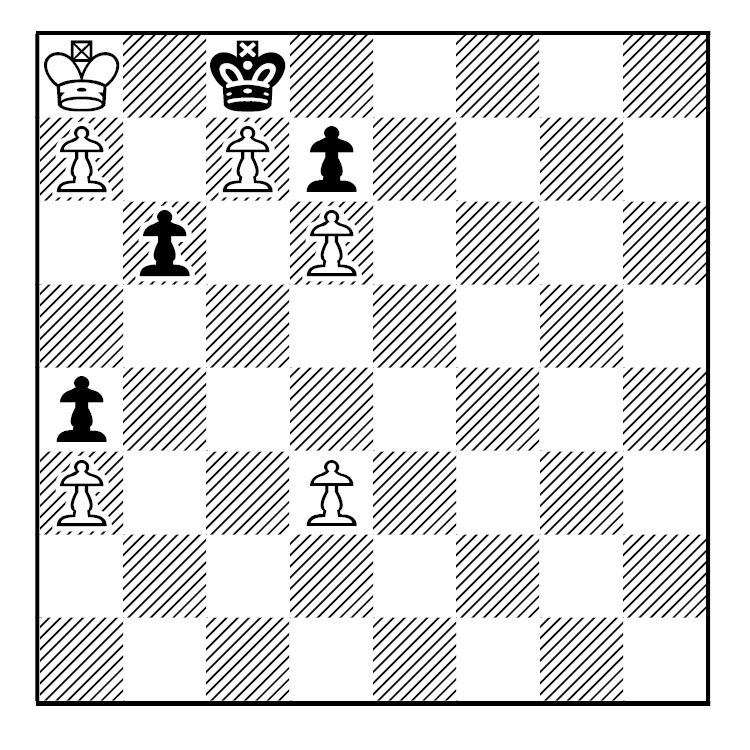
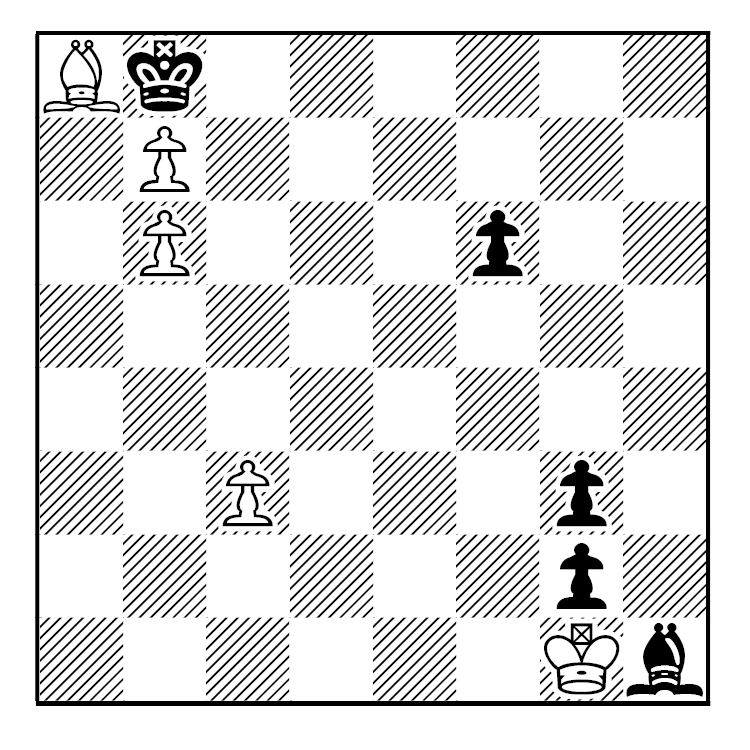
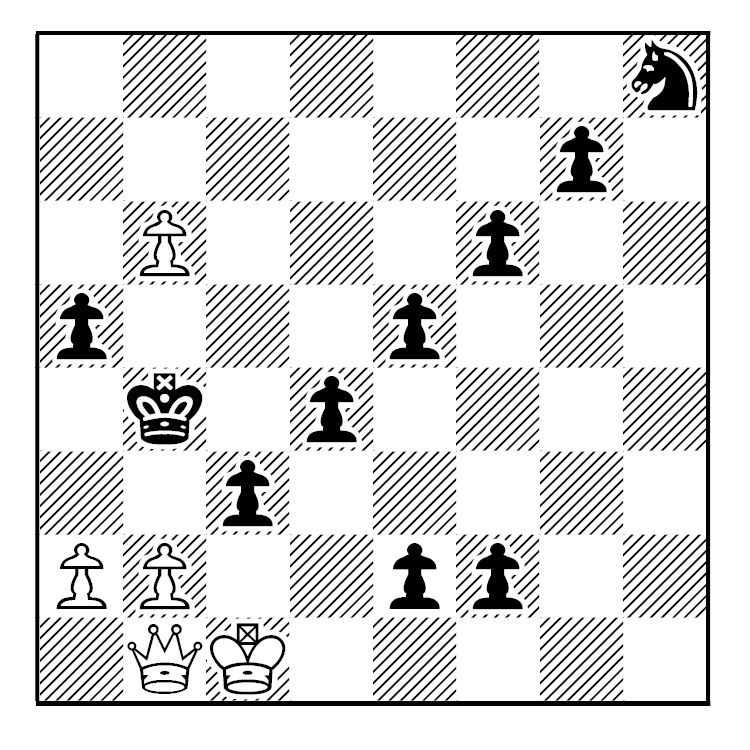
2019_11_21_A

Ropke, no date


2019_11_21_B

E.B. Cook, 1926


2019_11_21_C

Korolkov, 1958
[Hint: The black pawns are ready to promote and check the White king.]


2019_11_21_D

Escalante, 1994
[Hint: Black is threatening mate in one, three different ways.]


Solutions, in case you need them, will be presented next Thursday.

Lesser GM?

Like most chess players I am a fan of some of the greats; namely Fischer, Alekhine, and Tal.


But I also enjoy the lesser known greats, those IMs and GMs who occasionally can take an original route in the opening, explore what is there to find, and promote original theory.


One of those is the Finnish GM, Jouni Yrjola. He won his country’s championship in 1985 and 1988. And his flair for unexplored openings didn’t prevent him from earning the IM title (1984) or the GM title (1990).


More importantly, at least to this blogger, is that today is his birthday.


Happy Birthday Jouni!

~~~~~~~~~~~~~~~~~~~~~~~~~


Here is Yrjola, playing against a former World Champion.


IM Jouni Yrjola-GM Mikhail Tal
TV exhibition game, 1986
[D44]
1.d4 e6 2.c4 Nf6 3.Nf3 d5 4.Nc3 c6 5.Bg5 dxc4 6.e4 b5 7.e5 h6 8.Bh4 g5 9.Nxg5 hxg5 10.Bxg5 Nbd7 11.g3!? (Unusual. More common is 11.exf6. Perhaps Yrjola didn’t want to get into a tactical tussle with a Tal.) 11…Rg8 12.h4 Rxg5 13.hxg5 Nd5 14.Qh5 Nxc3 15.bxc3 Qa5 16.Rc1 Ba3 17.Rc2 Qa4 18.Kd1! (Effectively closing off the White’s queenside. Now Black must worry about his kingside.)
2019_10_24_A
18…Nf8 19.Qf3 Bb7 20.Rh8 Be7 (Black wants to castle queenside but first he needs to shore up his defenses on the kingside.) 21.Bh3 Bxg5? 22.Bxe6! 1-0


IM Julian Hodgson (2480)-IM Jouni Yrjola (2425)
Tallinn, Estonia, Apr. 8 1987
[B21]
1.e4 c5 2.f4!? (The Grand Prix Attack, a very popular way of meeting the Sicilian around this time.) 3…d5 (A strong defence, and one that almost put the Grand Prix out of business.) 3.exd5 Nf6 4.Bb5+ Nbd7 5.c4 a6 6.Ba4 b5 7.cxb5 Nxd5 8.Nf3 g6!? (The fianchetto on Black’s kingside usually leads to unbalanced games, perfect for both Hodgson and Yrjola.) 9.Nc3 N5b6


[This game, heading rapidly into more craziness, now forms theory.


Vladislav Zernyshkin (2319)-Yuri Yakovich (2539), Lev Polugaevsky Memorial, Samara, Russia, July 9 2011, continued with 10.d4 Bg7 11.Bc2 cxd4 12.Nxd4 O-O 13.O-O axb5 14.Ndxb5 Ba6 15.Bd3 Nc5 16.Be2 Nba4 17.Qc2 Nxc3 18.Nxc3 Qd4+ 19.Kh1 Nd3 20.h3 Rfd8 21.a4 Bc4 22.Ra3 Nb4 23.Qb1 Bd3 24.Bxd3 Nxd3 25.Qc2 e6 26.Nb5 Qe4 27.Nc3 Qc4 28.Qe2 Qb4 29.Na2 Nxc1 30.Nxc1 Bxb2 31.Rb3 Qd2 32.Rxb2 Qxe2 33.Nxe2 Rxa4 34.Rc1 Rd7 35.Kg1 e5 36.fxe5 Re4 37.Rc5 Re7 38.Kf2 R4xe5 39.Rxe5 Rxe5 40.Ng1 h5 41.Nf3 Re7 42.Ng1 Kg7 43.Kf3 Ra7 44.Rb3 Ra5 45.h4 Ra4 46.g3 Ra7 47.Nh3 Re7 48.Ng5 Kg8 49.Re3 Ra7 50.Ke4 Kg7 51.Kd5 Kf6 52.Kc6 Kf5 53.Kd6 f6 54.Ne4 g5 1/2-1/2]


10.d4 Nxa4 11.Qxa4 Bg7 12.Be3 Nb6 13.Qa5 O-O 14.O-O-O axb5 15.Qxb5 Ba6 16.Qxc5 Nc4! (Black has penetrated White’s position and his knight will prove to be impossible to dislodge.) 17.Rhe1 Qb8! (Forcing the next move.) 18.b3 Rc8! (White’s queen is trapped. Hodgson grabs the best deal he can make for his queen …) 19.Qxc8+ Bxc8 (…and then promptly resigns.) 0-1


GM Jonny Hector (2535)-GM Jouni Yrjola (2460)
Nordic Ch.
Ostersund, Sweden, Aug. 1992
[B76]
1.e4 c5 2.Nf3 d6 3.d4 cxd4 4.Nxd4 Nf6 5.Nc3 g6 6.Be3 Bg7 7.f3 Nc6 8.Bc4 O-O 9.Qe2 Bd7 10.O-O-O Na5 11.Bd3 (11.Bb3!?) 11…Rc8 12.h4 Rxc3 13.bxc3 Qc7 14.Qe1 d5 15.e5 Qxe5 16.Nb3 Nc6 17.g4 h5 18.g5 Ne8 19.Bd4 Nxd4 20.cxd4 Qd6 (Black could, of course, play 20…Qxd1 21.Rhd1, but that kills his play and he has to respond with 22…e6, which further limits his play. On 20…Qd6, his queen can at least travel to a3 and say “Boo!” Forgive this jest- it’s close to Halloween.) 21.Qc3 b6 22.Rhe1 Nc7 23.Rxe7 Ne6 24.Rxe6 Bxe6 25.Qd2 Rc8 26.c3 a5 27.Kb1 a4 28.Nc1 b5 29.Ne2 Rb8 30.Qf4 Bf8 31.Qxd6 Bxd6 32.Kc2 b4 33.cxb4 Rxb4 34.Rb1 Rxb1 35.Kxb1 Kg7 36.Kc2 f6 37.gxf6+ Kxf6 38.Kd2 g5 39.hxg5+ Kxg5 40.Ke3 h4 41.Nc3 h3 42.Bf1 Kh4 43.Kf2 a3 44.Nb5 Be7 45.Bd3 Bf6 46.Be2 Bd7 47.f4 Bg7 48.Bd3 Kg4 49.f5 Kf4 50.Kg1 Kg3 51.Kh1 Be8 52.Be2 Bd7 53.Bd3 Bf6 54.Nc3 Bc6 55.Ne2+ Kf3 56.Kh2 Ke3 57.Ba6 Bd7 58.Kxh3 Bxf5+ 59.Kg2 Be4+ 60.Kf1 Bxd4 61.Nxd4 Kxd4
2019_10_24_B
(Here, Black’s king is more centralized than White’s and he has an extra pawn. But it’s a draw as White can block the queening of the center pawn and Black’s other pawn is on a rook’s file, Right? Wrong!) 62.Ke1 Bb1 63.Kd2 Bxa2 64.Kc2 Kc5 65.Bb7 d4 66.Be4 Kb4 67.Bf5 Bb3+ 68.Kb1 Kc3 69.Ka1 Bc2 70.Bg4 d3 71.Ka2 Kb4
2019_10_24_C
0-1 [Incredibly Black wins after 72.Bh5 Bb3+ 73.Ka1 d2 74.Kb1 Kc3 75.Ka1 Kd3 76.Bf3 Ke3 77.Bg4 Kf2 78.Kb1 Ke1 79.Bh5 Bc4 80.Kc2 (with the idea of Be2) -+ , or 72.Ka1 d2 73.Ka2 Bb3+ 74.Kb1 Kc3 75.Be2 Kd4 76.Bf3 Ke3 77.Bh5 Kf2 78.Bg4 Ke1 79.Bh5 Bc4 80.Kc2 -+, or 72.Bf3 Bb3+ 73.Kb1 d2 74.Bh5 Kc3 75.Ka1 Kd3 76.Bf3 Ke3 77.Bg4 Kf2 78.Kb1 Ke1 79.Bh5 Bc4 80.Kc2 -+. Now, I had to run the position through a chess engine just to make sure my main ideas had some validity. It’s astonishing what a GM can figure out over the chessboard!]

AN INTRODUCTION TO THE UNDERPROMOTION, Part 1

There seems to be some confusion about underpromotions. Some players believe the rule for underpromotion goes something like this: “a pawn, upon reaching the eighth rank can be promoted to any piece”. This definition can produce some rather interesting problems. For example, it is White to move and mate in the following two problems.


Zuckertort?
White to Mate in 1

2019_09_04_A


Unknown
White to Mate in 1

2019_09_04_B


White’s first move in both problems is, of course, an underpromotion. Just not to his own color. In the first diagram, White checkmates with 1.g8=black Knight, while in the second, he mates with 1.bxa8=Black Rook.


The exact rule for underpromotion is that a player may promote to a Queen, Rook, Bishop or Knight of his own color.


There is at least one more misunderstood area of underpromotion. Some players insist that you may not legally promote to a piece that did not come with the original set. That means you could not promote a pawn if you still had your original seven pieces (Not counting the King; if you need to promote to a King it probably means that you’ve already lost the game). And you certainly could not have three Knights on the board at the same time. The pawn then must remain immobile after reaching the 8th rank.


However, the rule clearly states that you may have three (or more!) Knights. You can promote to a dark colored Bishop, even if your original one is still on the board. You may also have as many as nine Queens at the same time (eight promoted pawns plus the original Queen). In fact, the biggest obstacle to having nine Queens at the same time may be your opponent, who may not want to defend against the armada!


This may seem simple enough, but there is still confusion out there in the tournament arena.


The following is a game played by the author;


Ko-Escalante
Southern California Open, 1996

2019_09_04_C


47.Nd3+ Kb1 48.Ke1 [48.Nc1? and Black can either play 48…Nf3+ or 48…Nf6 (with the idea of Ne4), winning in either case. Now back to the underpromotion theme. If Black promotes to a Queen, White would be forced to take the Queen with 49.Nxc1 Kxc1. The two Knights versus none are overwhelming, but if Black underpromotes then White could conceivably ignore the new piece. In any case, Black loses nothing by underpromoting.] 48…c1=N [Now White went off to the Tournament Director (TD), complaining that Black could not have three Knights on the board at the same time. And I should promote to a Queen. What did he expect to win by that argument!? The TD told him my move was legal and sent him back to the game. Where he promptly erred.] 49.Ne5? (Now three Knights versus one are better odds for White’s survival than two Knights versus none. But when White starts moving his Knight away, it becomes three knights versus none. And the White King is soon overwhelmed.) 49…Kc2 50.Kf1 Nd3 51.Nf7 Ne3+ 52.Kg1 Nf3+


2019_09_04_D

0-1 And mate next move.


The Joseph Theme

In 1921, David Joseph, then 25 years old, was traveling in a train in England. It was during or about this time (sources differ) that he created a series of chess problems. The one given below appears to be simple to solve, but that is an illusion.


White Wins
[Joseph, 1921; Additional Analysis by Roycroft, The Chess Endgame Study, #145, pg. 104, and Escalante – just to make the notes easier.]


2019_03_21_Joseph


We are going to skip some space here so you can try to solve it yourself.


.

.

(You can write some notes here if you want)

.

.

.

.

.

(It’s more fun to try to solve a problem that just to look at the answer.)

.

.

.

.

.

(The answer is just below.)


.

.

.

.

1.h8=Q (1.h8=B? a1=Q 2.Bxa1 is not stalemate, but it does not win either.) 1…a1=Q 2.Qg8 (Of course not 2.Qxa1?? because it’s stalemate – RME ; 2.Qe8? Qg7 and soon draws, either by exchanging queens or by perpetual check.) 2…Qa2 3.Qe8 (Again, Black seeks a stalemate by offering his queen – RME ;  3.Qf8? Qa3, with, again, a perpetual, or stalemate if the black queen is taken.) 3…Qa4 4.Qe5+ Ka8 5.Qh8 +- (White wins. – RME)


Self-Destruction or the Big “Z”

ZUGZWANG is the compulsion to move in chess, where any move would result in loss of position, material, or game.


A player who is forced into this type of position does not want to move as any move by that player only makes winning the game easier for his opponent. In other words, he is forced to self-destruct, literally move by move.

Here are a few (simple) examples.
“abdo10000”-Escalante
Blitz Game
chess.com, Feb. 4 2019
[White made a miscalculation in the middlegame enabling Black to win a bishop. White could resign, but chooses to play on.]

2019_02_14_A46.Kh1 (White puts his king in a stalemate position. Unfortunately for him, he still has pawns he can move.) 46…Kf3 (Black can achieve the same result by …Kg3 or …Kh3. The important thing is to keep the white king trapped in the corner, when he must move his pawns.) 47.a3 bxa3 48.c4 a2 49.c5 a1=Qmate 0-1


Here two more examples, slightly more sophisticated.


Jonny Hector (2465)-Sergei Tiviakov (2490)
Stockholm, 1990
1.e4 c5 2.Nf3 d6 3.d4 cxd4 4.Nxd4 Nf6 5.Nc3 g6 6.Bc4 Bg7 7.h3 (A waiting move. More common is 7.Bb3.) 7…a6 8.O-O b5 9.Bb3 Bb7 10.Re1 O-O 11.Bg5 Nbd7 12.Nd5! (White usually does well if he can get this move in.) 12…Rc8 13.Qd2 Rc5 14.Nf3 Re8 15.c3 Qa8 16.Rad1 Nxd5 17.exd5 Nf6 18.Be3 Rxd5 19.Bxd5 Bxd5 20.Nh4 Bxa2 21.Bh6 Bh8 22.f4 Bb3 23.Ra1 Ne4 24.Qe3 Bd5 25.Qb6 Bb7 26.Re3 Bf6 27.Nf3 Ng3 28.Bg5 Nf5 29.Ree1 Bg7 30.Nh4 f6 31.Nxf5 gxf5 32.Bh4 Kf7 33.Re2 Bh6 34.Bg3 Qc8 35.Kh2 Qc4 36.Rf2 Qe4 37.Rf3 Qc6 38.Rxa6 Qxb6 39.Rxb6 Bxf3 40.gxf3 Ra8 41.Rxb5 Ra2 42.Kg1 Bf8 43.c4 Ra1+ 44.Kf2 Rc1 45.b3 Rc2+ 46.Kf1 h5 47.Rxf5 Rc3 48.Rb5 h4 49.Bf2 Bh6 50.f5 Rc1+ 51.Kg2 Rc2 52.f4 Bxf4 53.Kf3 Bg3 54.Be3 (White is still winning after 54.Bxg3 hxg3 55.Kxg3 Rc3+ 56.Kg4. The text move keeps the tension on the board.) 54…Be1 55.Rb8 Rh2 56.Bh6 e5 57.Rb7+ Ke8 58.Bg7 Rxh3+ 59.Ke4 Kd8 60.Bxf6+ Kc8 61.Rh7 Rxb3 62.Kd5 Rb7 63.Rh8+ Kd7 64.Bxh4! Bxh4 65.Rh7+ Be7 66.f6 Ke8 67.Ke6 d5 68.c5 Rc7 69.Rxe7+ Rxe7+ 70.fxe7
2019_02_14_B
1-0


Of course, such self-destruction is not limited to pawns only endgames.


GM Spassky-GM Fischer
World Ch.
Reykjavik, July 11 1972
Game 1
1.d4 Nf6 2.c4 e6 3.Nf3 d5 4.Nc3 Bb4 5.e3 O-O 6.Bd3 c5 7.O-O Nc6 8.a3 Ba5 9.Ne2 dxc4 10.Bxc4 Bb6 11.dxc5 Qxd1 12.Rxd1 Bxc5 13.b4 Be7 (This position is more or less drawish. Mariotti-Tatai, Match, Rome, 1972 continued with 14.Nfd4 Bd7 15.Bb2 Nxd4 16.Nxd4 Rac8 17.Rac1 Rfd8 18.Bb3 Kf8 19.Rxc8 Rxc8 20.Rc1 Rxc1+ 21.Bxc1 1/2-1/2. Spassky’s move is more dynamic.) 14.Bb2!? Bd7 15.Rac1 Rfd8 16.Ned4 Nxd4 17.Nxd4 Ba4 18.Bb3 Bxb3 19.Nxb3 Rxd1+ 20.Rxd1 Rc8 21.Kf1 Kf8 22.Ke2 Ne4 23.Rc1 Rxc1 24.Bxc1 f6 25.Na5 Nd6 26.Kd3 Bd8 27.Nc4 Bc7 28.Nxd6 Bxd6 29.b5 Bxh2?? (Black, who is the aspiring to be the next world champion, makes a horrible beginner’s move. Black never recovered in this game. And didn’t show up for the next one. Only two games into the match and Bobby was down 0-2. The fact that he won this match, and the world championship, is simply incredible.) 30.g3 h5 31.Ke2 h4 32.Kf3 Ke7 33.Kg2 hxg3 34.fxg3 Bxg3 35.Kxg3 Kd6 36.a4 Kd5 37.Ba3 Ke4 38.Bc5 a6 39.b6 f5 40.Kh4 f4 41.exf4 Kxf4 42.Kh5 Kf5 43.Be3 Ke4 44.Bf2 Kf5 45.Bh4 e5 46.Bg5! e4 47.Be3 Kf6 48.Kg4 Ke5 49.Kg5 Kd5 50.Kf5 a5 51.Bf2 g5 52.Kxg5 Kc4 53.Kf5 Kb4 54.Kxe4 Kxa4 55.Kd5 Kb5 56.Kd6

2019_02_14_C

(White can play Kc7 protecting his pawn while attacking Black’s. Black has no choice but to play 56..Ka6. White will reply with Bd4 and Black can either give up protecting his pawn. or run his pawn down the a-file, and wait for White to play an eventual Bxa1. And then Black has to give up the a6 square.)

1 Q vs. 2 R

I like heavy endings, that is with queens and rooks. Not too many books deal with these types of endings, leaving the student with many questions unanswered.


Here is one type that interests me. It comes in form of a question.


Which is stronger in the endgame, a queen or two rooks? Here’s an introduction.


Let’s first look at four well-established guidelines for these types of endings.


(1) If the rooks are not connected, then the side with the single queen has the advantage.


(2) If the rooks are connected, then that side has the advantage.


(3) The advantage always lies with the player who has the initiative.


(4) Having the advantage that does not mean that side can win the game.


Here’s the first example.


Wilson-Thompson
Detroit, 1990
[White, with the single queen, is the one with the initiative but cannot break through the Black’s defence. Neither side is in real danger as Queen versus two connected Rooks endings, with nothing else on the board, are almost always drawn.]
1.e4 e5 2.Nf3 Nc6 3.Bc4 Nf6 4.Ng5 d5 5.exd5 Na5 6.Bb5+ c6 7.dxc6 bxc6 8.Qf3 Rb8 9.Bxc6+ Nxc6 10.Qxc6+ Nd7 11.d4 Be7 12.Nf3 Rb6 13.Qa4 exd4 14.O-O (Tempting is 14.Nxd4. But after 14… Rb4 15.Nc6 Rxa4 16.Nxd8 Bxd8, Black wins a piece. And after 14.Qxd4 O-O 15.O-O Bc5, White’s queen gets kicked around.) 14…O-O 15.a3 Bf6 16.b4 Ba6 17.Re1 Bc4 18.Qxa7 Qc8 19.Bf4 Rb7 20.Qa5 Bb5 21.Bg5 Bxg5 22.Nxg5 Nb8 23.Ne4 Nc6 24.Nd6 Qd7 25.Qxb5 [Surely better is 25.Nxb5 Ra7 (25…d3 26.cxd3 Rxb5 27.Qxb5 Qd4 28.Nd2) 26.Qb6 Rb8 27.Qc5 +-] 25…Rxb5 26.Nxb5 Nxb4 27.Nxd4 Qxd4 28.c3 Qf6 29.axb4 g6 30.Ra2 Rd8 31.Rc2 Qe6 32.Rec1 Qe4 33.Nd2 Qe2 34.Nf1 Qb5 35.Rb2 Qg5 36.Rbb1 f5 37.c4 f4 38.Rc3 Qf5 39.Rbc1 Rb8 40.Rb3 Qg5 41.Rcb1 Qf5 42.c5 g5 43.h3 h5 44.c6 Qb5 45.Rc3 Kf7 46.Rc5 Qd3 47.c7 Rc8 48.Rbc1 g4 49.R1c3 Qb1 50.hxg4 hxg4 51.R5c4 Qf5 52.g3 fxg3 53.Nxg3 Qd5 54.Rc5 Qd1+ 55.Kg2 Qa4 56.b5 Qa8+ 57.Kg1 Ke6 58.Rc6+ Kd7 59.Ne4 Qa1+ 60.Kg2 Qb1 61.Nf6+ Ke7 62.b6 Rh8 63.Rc1 (63.Nd5+ Kf7 64.Rf6+ Kg7) 63…Qf5 64.Ng8+ Rxg8 65.c8=Q Rxc8 66.Rxc8 Qf3+ 67.Kg1 g3 68.R8c7+ Kd6 69.R1c2 gxf2+ 70.Kf1 Qd3+ 71.Kxf2 Qd4+ 72.Kf1 Qxb6

 2019_02_07_A

 73.R7c3 (Simply 73.Rc6+ draws.) 73…Qb5+ 74.Ke1 Qe5+ 75.Kd1 Qh5+ 76.Re2 [76.Kc1 Qh1+ (76…Qg5+ 77.Kd1 Qg1+ 78.Kd2 Kd5 79.Rc5+ Kd4 80.R5c4+ Kd5 81.Rc5+) 77.Kb2 Qb7+ 78.Kc1]76…Qh1+ 77.Kc2 Qa1 78.Rd3+ Kc5 79.Rb3 Qa2+ 80.Rb2 Qa4+ 81.Kc1 Qa1+ 82.Kc2 Qa4+ 83.Kd2 Qd4+ 84.Kc1 Qf4+ 85.Kb1 Qf1+ 86.Ka2 Qf7+ 87.Rb3 Qa7+ 88.Kb2 Qg7+ 89.Rc3+ Kb4 90.Re4+ Kb5 91.Rc4 Qe5 92.Rc8 [Again, a simple draw can be found with a check (92.Rc5+ =)]92…Qe2+ 93.Rc2 Qe5+ 94.Kb1 Qe1+ 95.Kb2 Qe5+ 96.R2c3 Qe2+ 97.Ka3 Qe7+ 98.Ka2 Qe2+ 99.Rc2 (99.Rc5+ is yet another draw.) 99…Qe6+ 100.Kb1 Qe1+ 101.Kb2 Qe5+ 102.R2c3 Qe2+ 103.Kb1 Qe1+ 104.Ka2 Qe2+ 105.Rc2 Qe6+ 106.Kb1 Qe1+ 107.Rc1 Qe4+ 108.R8c2 (Passive, but still enough to draw. 108.R1c2 is better, as White still has a possible check if necessary.) 108…Kb4 109.Ka1 Qd4+ 110.Ka2 Qd5+ 111.Kb1 Qd3 112.Kb2 Qd4+ 113.Ka2 Qd5+ 114.Ka1 Qd4+ 115.Kb1 Qd3 116.Kb2 Qd4+ 117.Kb1 Qd3 118.Kb2 Qd4+ 119.Ka2 Qd5+ 120.Kb1 Qd3 1/2-1/2


Adding a single pawn to either side obviously increases the chances for that side. The plan should always try to push the pawn towards a promotion.


Adding two isolated pawns to the side with the Queen, the result is almost always a win, even without a promotion.


Lausch-Zajontz
corres., 1991
1.e4 e5 2.Nf3 Nc6 3.Bc4 Bc5 4.c3 Nf6 5.d4 exd4 6.cxd4 Bb4+ 7.Nc3 Nxe4 8.O-O Bxc3 9.d5 Bf6 10.Re1 Ne7 11.Rxe4 d6 12.Bg5 Bxg5 13.Nxg5 h6 14.Qe2 hxg5 15.Re1 Kf8 16.Rxe7 Be6 17.Rxe6 fxe6 18.dxe6 Qf6 19.e7+ Ke8 20.Qc2 c6 21.Ba6 bxa6 22.Qxc6+ Kf7 23.Qd5+ Kg6 24.Re6 Rae8 25.Qxd6 Kf7 26.Rxf6+ gxf6 27.Qxa6 Rxe7 28.g3 Rc7 29.Qd6 Rhc8 30.Qd4 Rc1+ 31.Kg2 R8c7 32.h4 gxh4 33.Qxh4 R1c2 34.g4 Kg7 35.g5 fxg5 36.Qxg5+ Kf8 37.Qd8+ Kf7 38.b4 Ke6 39.Qg8+ Kf6 40.Qd5 Rg7+ 41.Kf3 Rcc7 42.Kf4 Rge7 43.a4 Kg7 44.b5 Kf8 45.f3 Ke8 46.a5 Rf7+ 47.Kg3 Rg7+ 48.Kf2 Rc2+ 49.Ke3 Re7+ 50.Kd3 Rcc7 51.Qg8+ Kd7 52.b6 axb6 53.axb6 Rb7

  2019_02_07_B

54.Qd5+ Ke8 55.Qc6+ Rbd7+ 56.Kc4 Kf8 57.f4 Rf7 58.f5 Kg7 59.Qg6+ Kf8 60.f6 Rb7 61.Qh6+ Kg8 62.Qg5+ Kf8 63.Qe5 Kg8 64.Kc5 Rf8 65.Qd5+ Rff7 66.Qf3 Kh7 67.Qg2 Kh6 68.Kc6 Rh7 69.Kd5 Rhf7 70.Ke6 1-0


GM Jansa (2455)-GM A. Soklov (2570)
Gausdal, 1990
[It would be hard to expand on the notation. GM Jansa annotated this ending in I/50, Ending # 13.]


2019_02_07_C

1…Ka7! [1…Rfc5+ 2.Kd4 Rxa5 (2…Ka7 3.Qe7+ +-) 3.Qa8+ +- ; 1…Rf4+? 2.Kd3 +-] 2.a6!? [2.c7 Rfc5+ 3.Kd4 Rd5+! 4.Qxd5 Rxd5+ 5.Kxd5 Kb7 6.Kd6 Kc8= ; 2.Qe7+ Ka6 3.c7 Rfc5+ 4.Kd4 Rd5+ 5.Ke4 Re5+ 6.Qxe5 Rxe5+ 7.Kxe5 Kb7=] 2…Rfc5+ (2…Kxa6? 3.Qa8+ Kb6 4.Qb7+ +- ; 2…Rbc5+? 3.Kd4 Kxa6 4.Qa8+ Kb6 5.Qb7+ Ka5 6.c7 +-) 3.Kd4 Kxa6? [3…Rxc6? 4.Qd7+ Kb6 5.Qb7+ ; 3…Rc1? 4.Qe7+! Kxa6 (4…Ka8 5.c7 +-) 5.Qa3+ +- ; 3…Rc2! 4.Qe7+ (4.c7 Rbc5= ; 4.Qc8!? Rbb2!=) 4…Kxa6 5.c7 Rbc5 6.Qxc5 Rxc5 7.Kxc5 Kb7=] 4.Qa8+ Kb6 5.Qb7+ Ka5 6.Qa7+ Kb4 7.Qe7! (7…Ra5 8.c7) 1-0


With two isolated pawns with the two rooks, a win for that side is the most likely outcome. But examples are hard to find. We’ll cover more in a later post.

Bridge Building

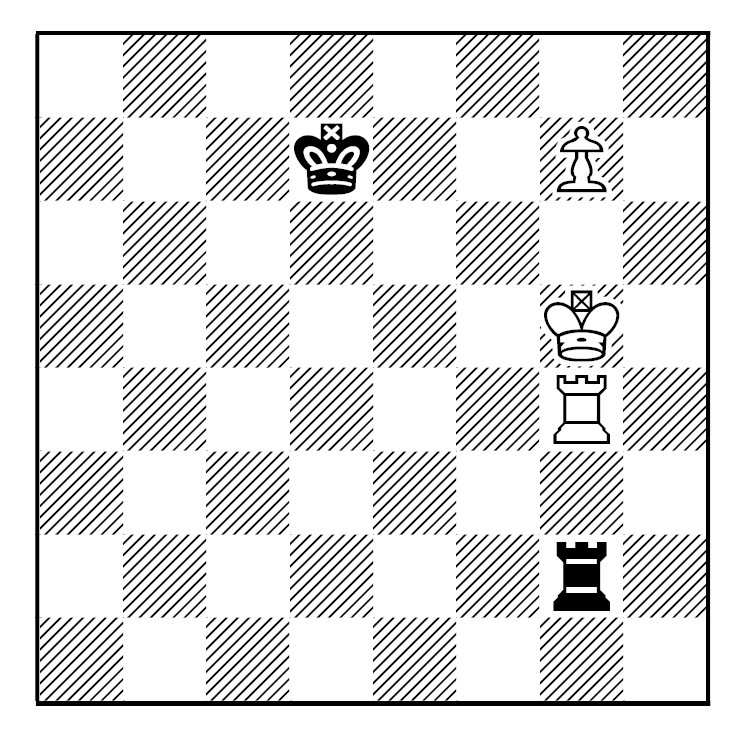
Can White win from this diagram?

 
Yes, but his King must move backwards to attain the win. The process is known as Bridge Building and was discovered by Lucena in 1497.

2018_09_06_A

1.Re1+ (To chase the enemy king so White’s own king can eventually move out of g8.) 1…Kd7 2.Re4! (This is probably how the term “Bridge-Building” came about. The king and rook need to link up with each other.) 2…Kd6 3.Kf7 Rf2+ 4.Kg6 Rg2+ 5.Kf6 Rf2+ 6.Kg5 Rg2+ 7.Rg4 +-

2018_09_06_B

And the pawn is free to promote.

Two Dances Of The Endgame

QUEEN


If you are fortunate to be a Queen ahead at the end of the game, congratulations! It means that you should be able to checkmate the enemy King.


There are many books that can show you how to checkmate, but I prefer this method.


It’s called the dance of the Queen (or the Chess Tango).

2018_08_29_A

First of all, please note that the enemy King can only mated on the edge or corner of the board. We will let Black play first as this will show the method clearer than if White was to move.


Black moves away from of the side of the board and plays 1…Kd5.


Since Black did not move backwards, White just moves his King closer to the action; 2.Kg2. Black moves again with 2…Kc6, or one diagonal square backwards. White’s Queen moves in the same direction as the Black King, in other words she dances with him; 3.Qd4. We are now doing the tango.


Play might then continue as 3…Kc7 (one square backwards) 4.Qd5 (one square forwards) 4…Kb6 5.Kf3 Ka6 (one square to the side) 6.Qc5 (one square to the side) 6…Kb7 7.Qd6 Ka8.


At this point, The King is already on the Back rank, White’s bes plan is to let him just move along the back rank. So 8.Qd7 (watch out, 8.Qc7 is stalemate!) Kb8 9.Ke4 (White just moves his King closer) 9…Ka8 10.Kd5 Kb8 11.Kc6 Ka8 (what else?) 12.Qb7mate.


ROOK


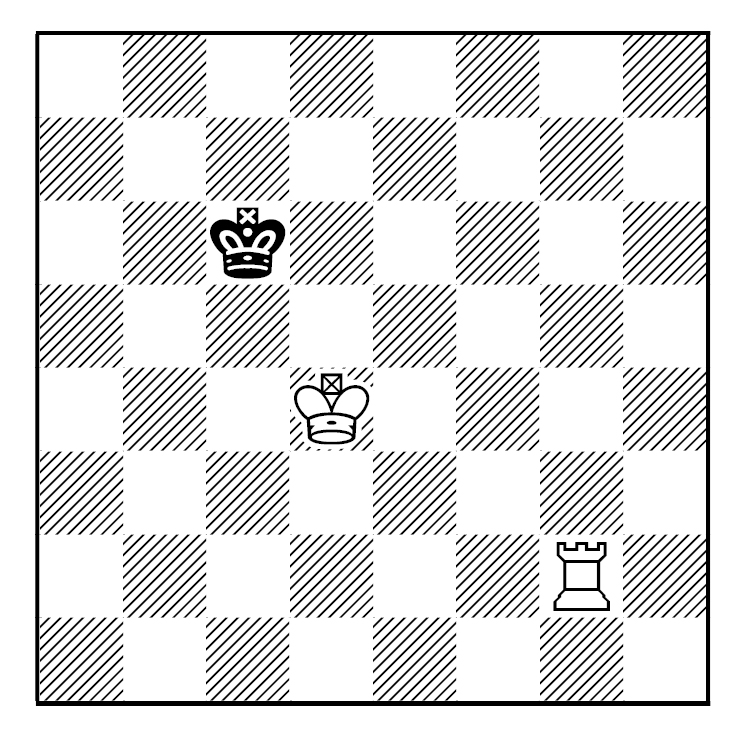
This is only slightly harder to win. The enemy King again must be driven to the side or corner of the board. And both the King and Rook must do the tango.

2018_08_29_B

First of all, if it is White to move, he makes the dance floor smaller with 1.Rg5. Notice how the Black King simply cannot run away to b5. He is forced to dance.


So Black plays 1…Kb6. If Black King moves to c7 (one square backwards), the White Rook dances to g6 (again, one square forward).


Since the King has move to the side, White dance with his King with 2.Kc4. And so it goes on with 2…Ka6 3.Kb4 Kb6. And now that both Kings are so close enough to see each other (Kings have very bad eyesight), the Rook comes over to check up on them. Yes, its a bad pun, but 4.Rg6+ is the only way to make progress.


The rest of the game could continue as such: 4…Kc7 5.Kc5 (I want to keep my eye on you!) Kd7 6.Kd5 (to continue the dance!) Ke7 7.Ke5 Kf7 8.Ra6 (got to save the Rook!) Kg7 9.Kf5 Kh7 10.Kg5 Kg7 (he ran out of room!) 11.Ra7+ (needs to check up on the monarchs) Kg8 12.Kf6 Kh8 13.Kg6 Kg8 14.Ra8mate